
Setting Up a .NET Testing Environment with XUnit V3
Let's start creating our project. When building professional applications in .NET, the foundation is everything. Before writing a single line of assertion logic, we need to establish a solid solution structure.
In this post, we are going to walk through the entire process of setting up a .NET solution designed for testing. We will cover how to organize your test projects compared to your production code, how to configure XUnit (specifically focusing on the new Version 3), and finally, how to run your tests and interpret the results.
We will primarily use the terminal and the Command Line Interface (CLI) to perform these steps. Why do I prefer this approach? Because CLI commands are universal. You can apply these instructions regardless of your machine or operating system. If you have the .NET SDK installed, you can follow along. However, I will also take a moment to demonstrate how to perform these actions using an Integrated Development Environment (IDE) like JetBrains Rider, giving you a complete picture of your development options.
Organizing Your Solution Structure
The first step is organization. How should we structure our folders? Typically, you will encounter one of two approaches in the .NET ecosystem.
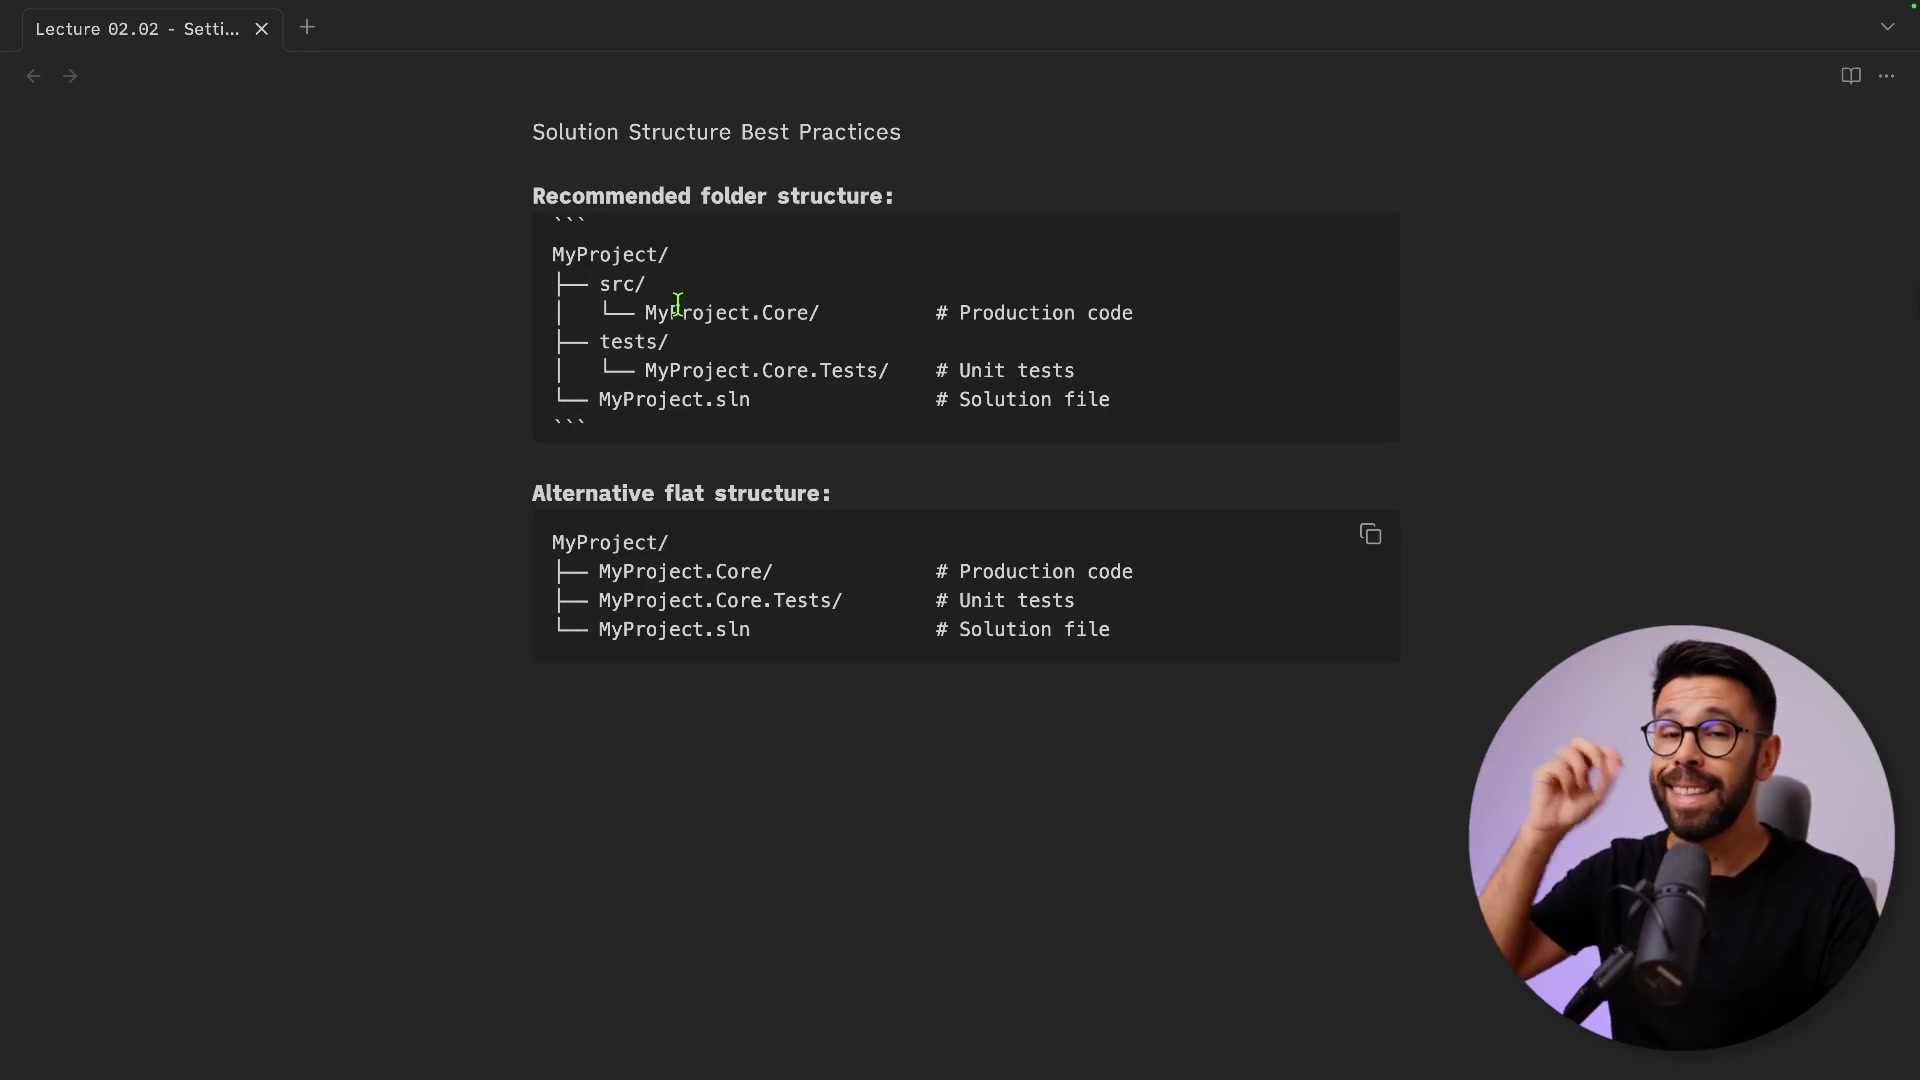
The Recommended Approach: Src and Tests
The approach I highly recommend involves separating your production code from your testing code at the root level. Inside your solution folder, you create two distinct directories: src and tests.
As shown above, the src folder contains your production code, your APIs, your domain logic, and everything that will eventually be deployed. The tests folder houses all your testing projects. This is a very common and clean practice in the .NET community.
The Alternative: Flat Structure
There is another approach you might see, particularly in smaller projects or microservices. In this scenario, all projects live at the same level alongside the solution file.
In this flat structure, the distinction is made purely through naming conventions. If you have a project named MyProject.Core, the corresponding test project is typically named MyProject.Core.Tests. While this is valid, the separation provided by the src and tests folders usually offers better organization as your solution grows.
For this guide, we will proceed with the recommended src and tests structure.
Building the Solution via CLI
Let's get our hands dirty and build this structure from scratch using the terminal. I'm starting with an empty directory containing only a README.md file.
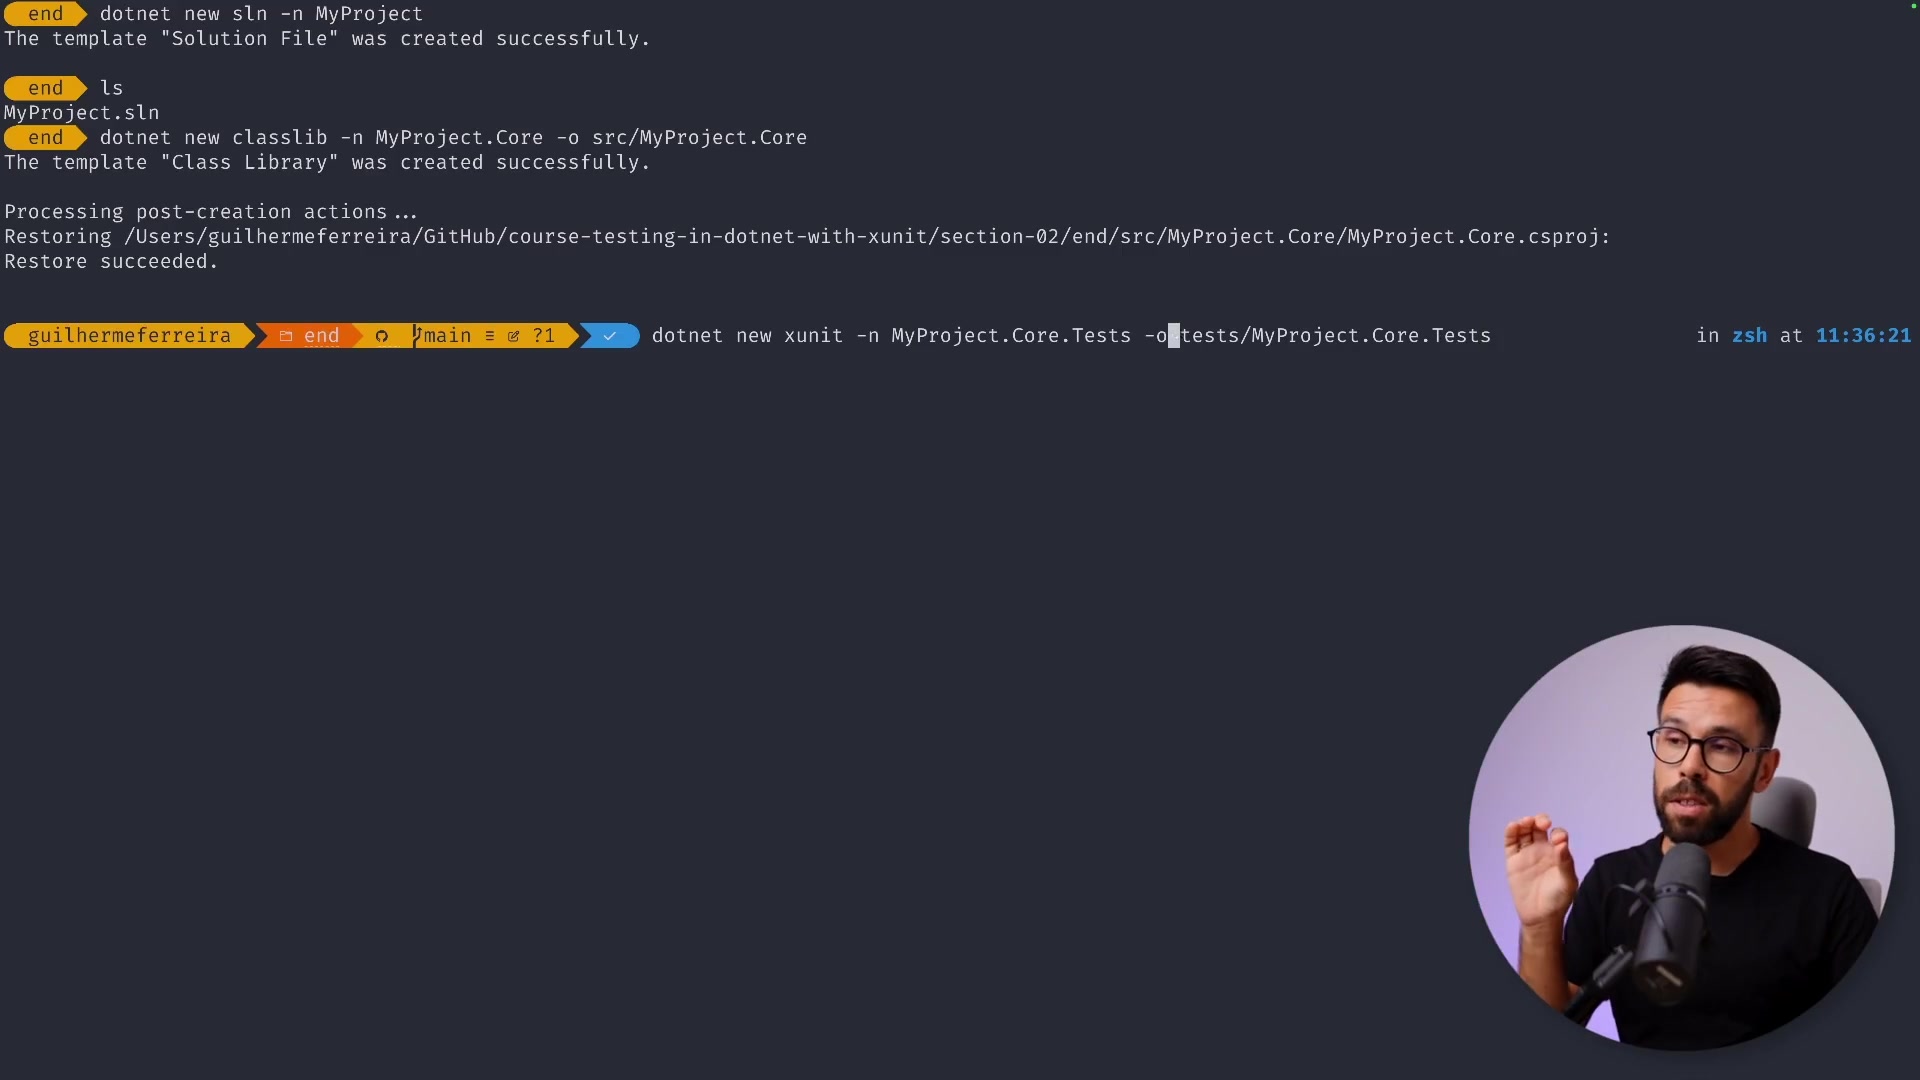
Step 1: Create the Solution File
First, we need to create the solution file (.sln) which acts as a container for our projects. We use the dotnet new command for this.
dotnet new sln -n MyProject
In this example, I am naming the solution "MyProject", but you should obviously use a name relevant to your specific application.
Step 2: Create the Production Project
Next, we create the project where our "code under test" will live. We will use a Class Library for this example. We want this project to reside inside the src folder.
dotnet new classlib -n MyProject.Core -o src/MyProject.Core
Here, we specify the name MyProject.Core and use the -o flag to define the output directory as src/MyProject.Core.
Step 3: Create the XUnit Test Project
Now, let's create our test project. We will use the XUnit templates. It is important to note that I am using XUnit Version 3 for this guide. If you are used to Version 2, the command might look slightly different (usually just xunit). For V3, the template name is xunit3.
dotnet new xunit3 -n MyProject.Core.Tests -o tests/MyProject.Core.Tests
Troubleshooting Note: If you try to run this command and receive an error, it is likely that you do not have the XUnit V3 templates installed. You can install them easily by running:
dotnet new install xunit.v3.templates
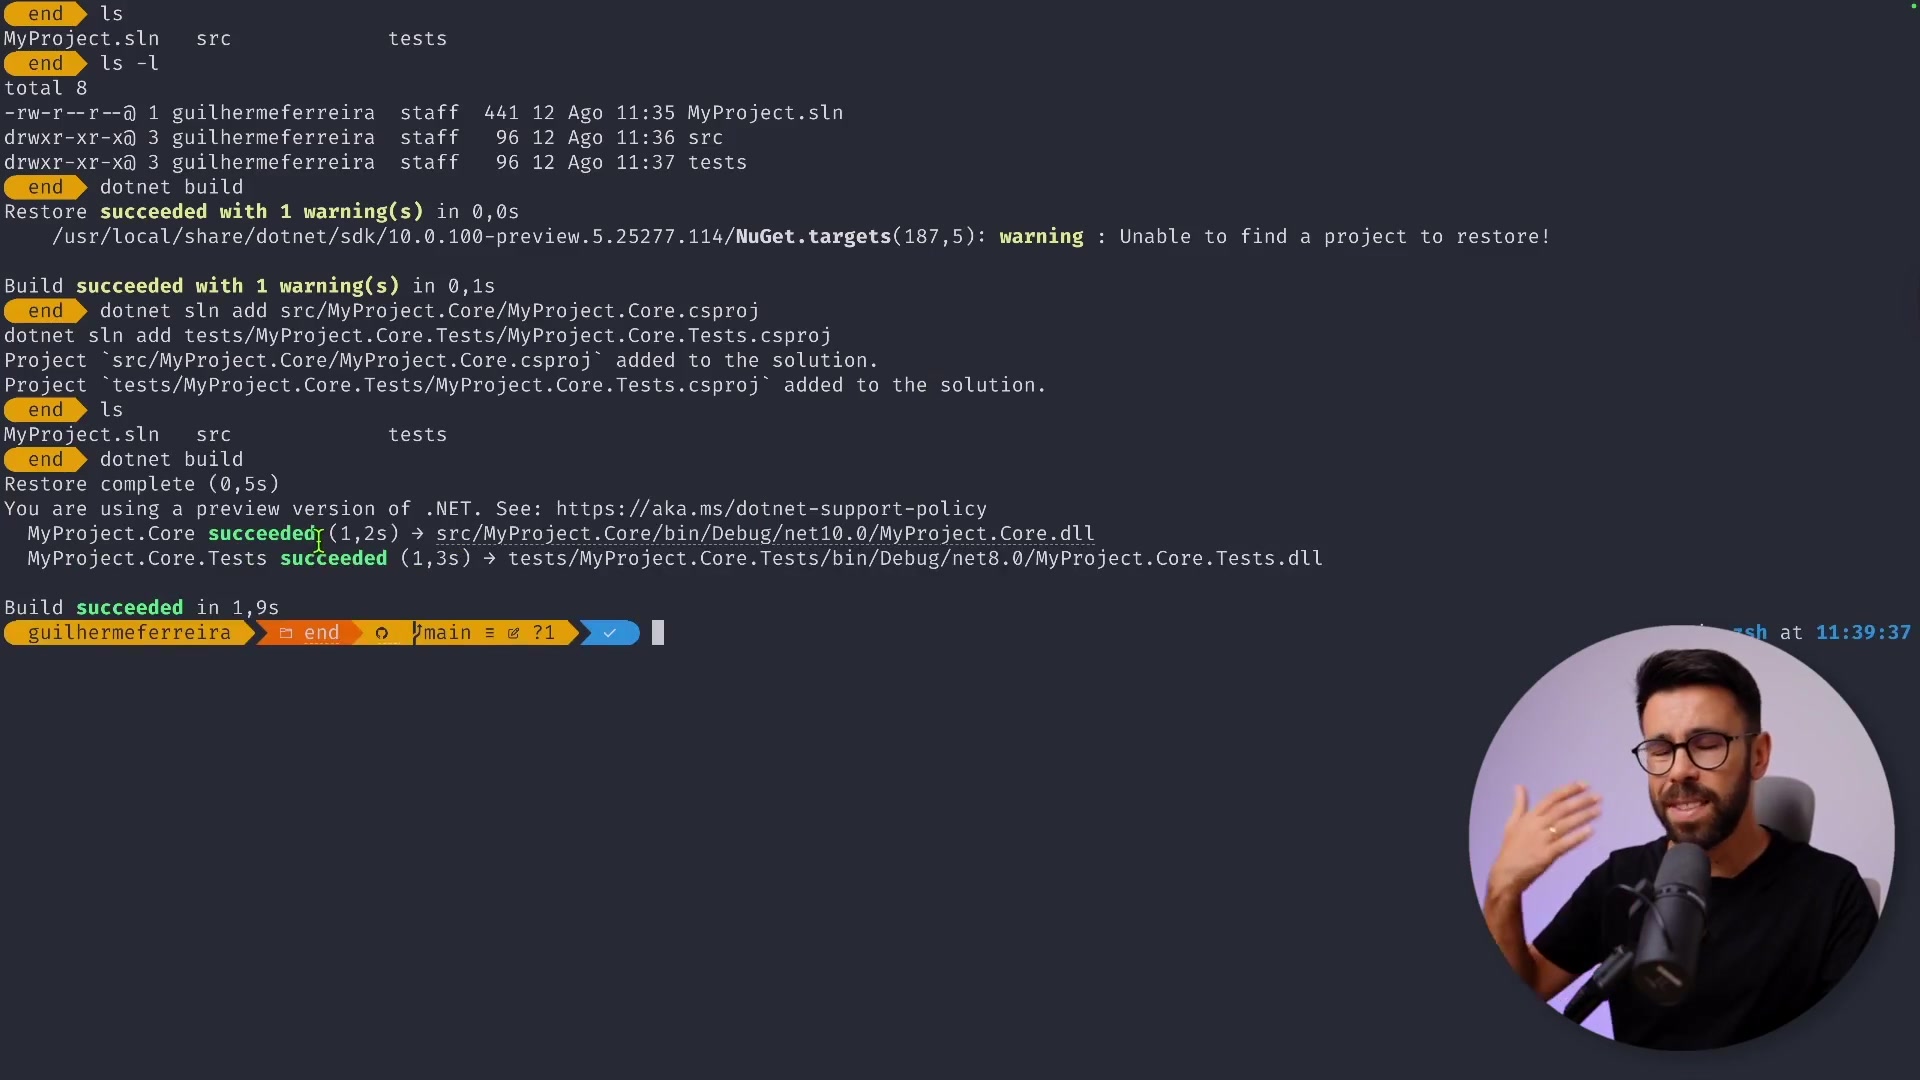
Step 4: Add Projects to the Solution
At this point, we have created the folders and project files, but the solution file (.sln) doesn't know they exist yet. If you were to open the solution in Visual Studio now, it would appear empty. We need to explicitly add our projects to the solution.
dotnet sln add src/MyProject.Core/MyProject.Core.csproj
dotnet sln add tests/MyProject.Core.Tests/MyProject.Core.Tests.csproj
Now, if you run dotnet build, the CLI will find both projects and compile them successfully.
Step 5: Establishing References
A test project is essentially a console application that runs your tests. For it to test your production code, it needs to know about that code. We must add a project reference from the Test project to the Core project.
dotnet add tests/MyProject.Core.Tests reference src/MyProject.Core

This command tells the test project, "Hey, you are allowed to use the classes and logic defined in MyProject.Core." Without this, your tests would not be able to access the code you intend to verify.
Running Tests from the Terminal
With the structure in place and references established, we are ready to run our tests. The CLI provides a powerful command for this: dotnet test.
When you run this command, the .NET SDK looks inside your solution for any projects marked as test projects. It then discovers the tests within those projects and executes them.
dotnet test
As you can see, the output indicates that the build succeeded and the tests passed. This confirms that our environment is correctly configured and ready for development.
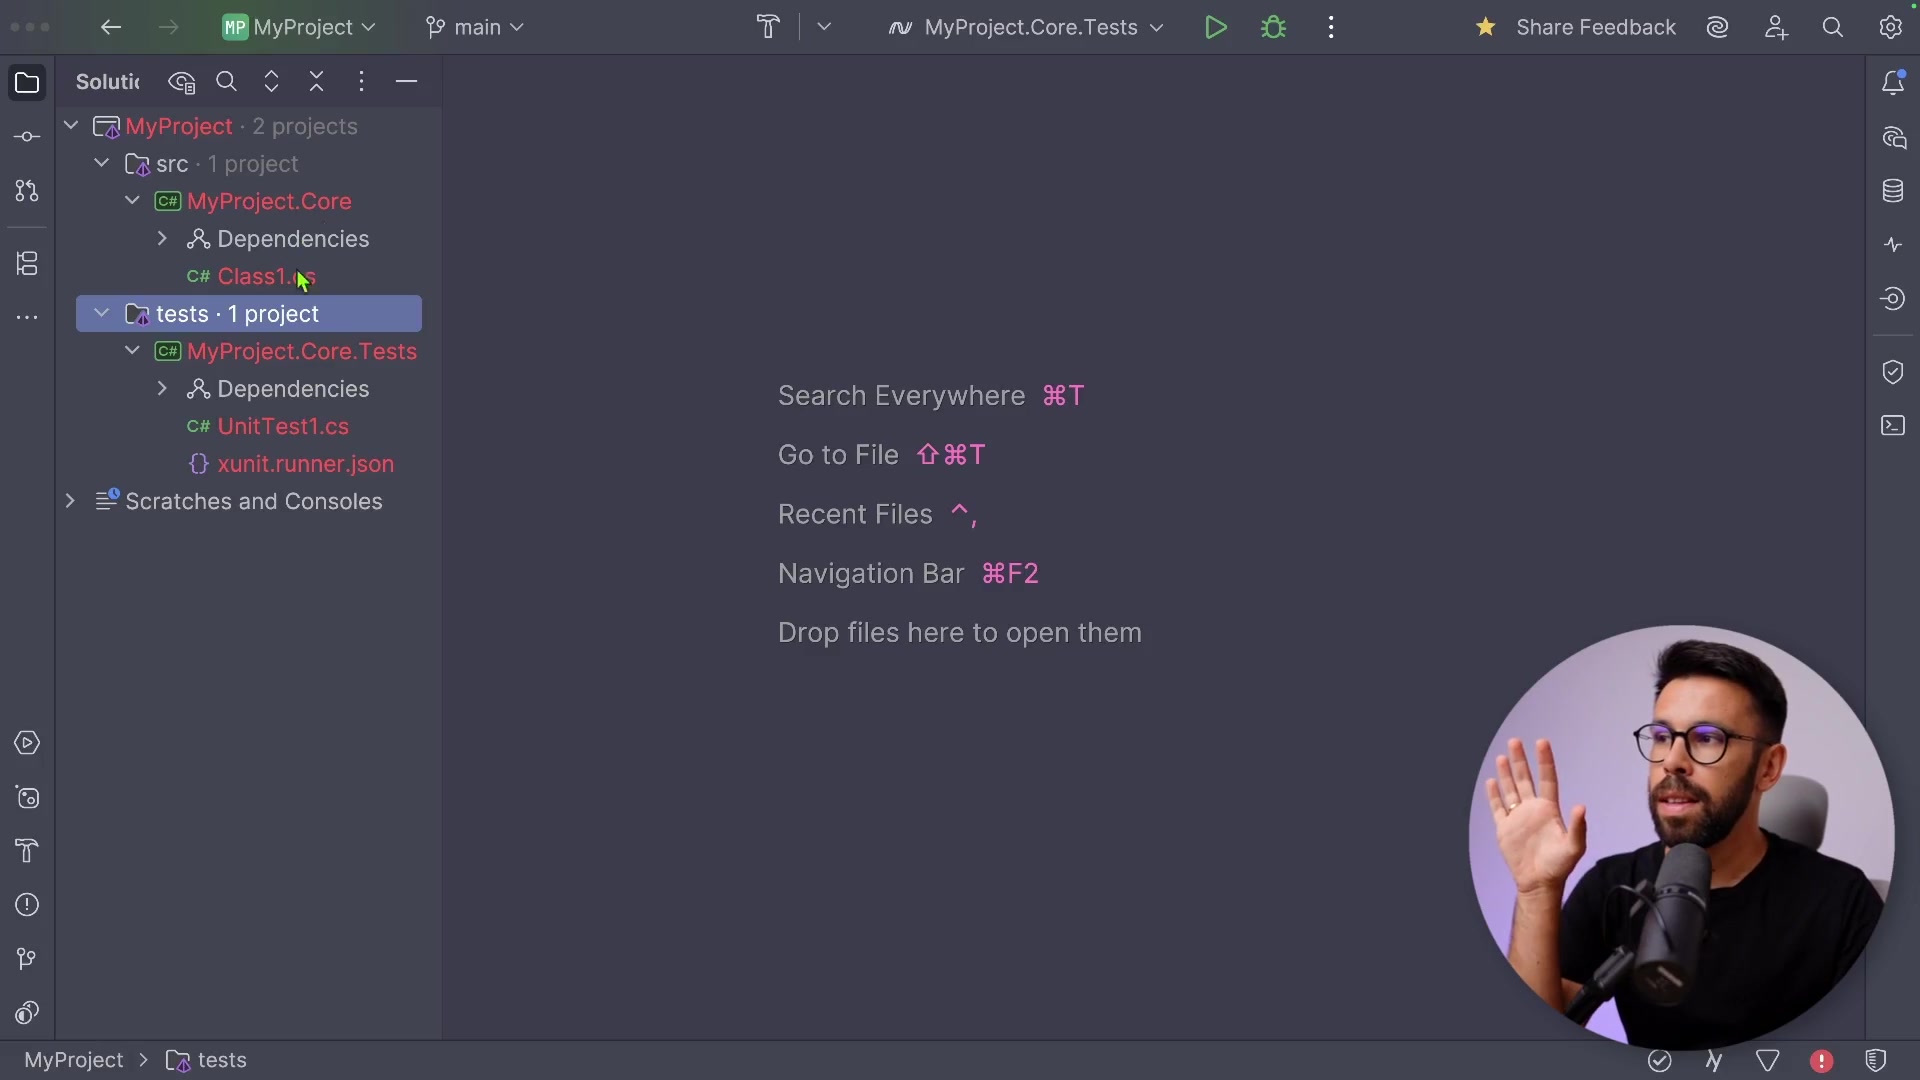
The IDE Experience: JetBrains Rider
While the CLI is great for automation and understanding the underlying mechanics, most of us spend our days inside an IDE. Let's look at how this setup translates to an environment like JetBrains Rider (or Visual Studio).
When creating a new project via the IDE wizard, you will see similar options. You can select "Unit Test", choose your framework (like .NET 9), and select your testing library (XUnit).

The IDE handles the folder creation and solution association for you, but under the hood, it is executing the same logical steps we performed manually.
Analyzing the Project Structure
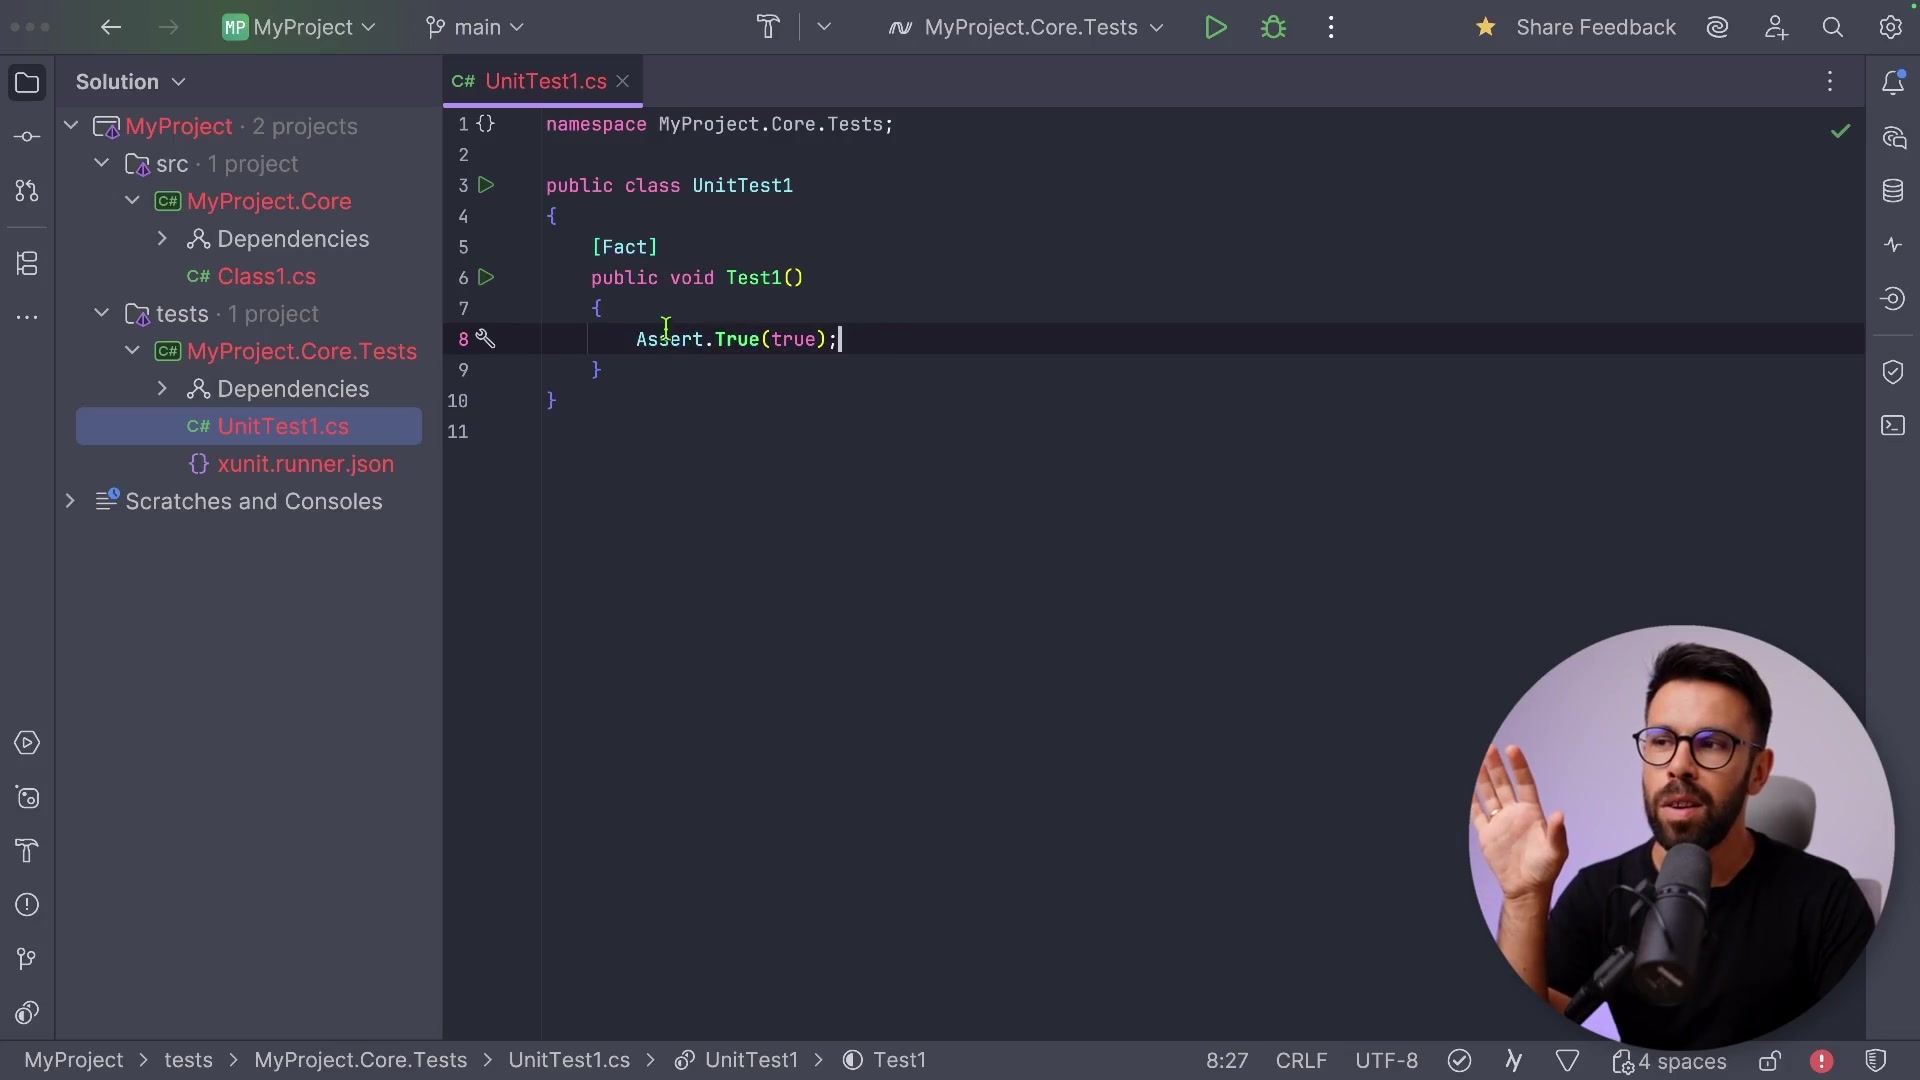
Once opened in the IDE, you will see your solution structure. In the test project, you will typically find a configuration file (like xunit.runner.json) and a sample test file.
Let's examine a standard XUnit test file:
namespace MyProject.Core.Tests;

public class UnitTest1
{
    [Fact]
    public void Test1()
    {
        Assert.True(true);
    }
}
In this snippet, the [Fact] attribute is crucial. It tells the test runner that the Test1 method is a test case that should be executed. The method uses an assertion, Assert.True(true), which effectively says, "Ensure that the value true is indeed true." This is a passing test by default.
Understanding the XUnit V3 Project File
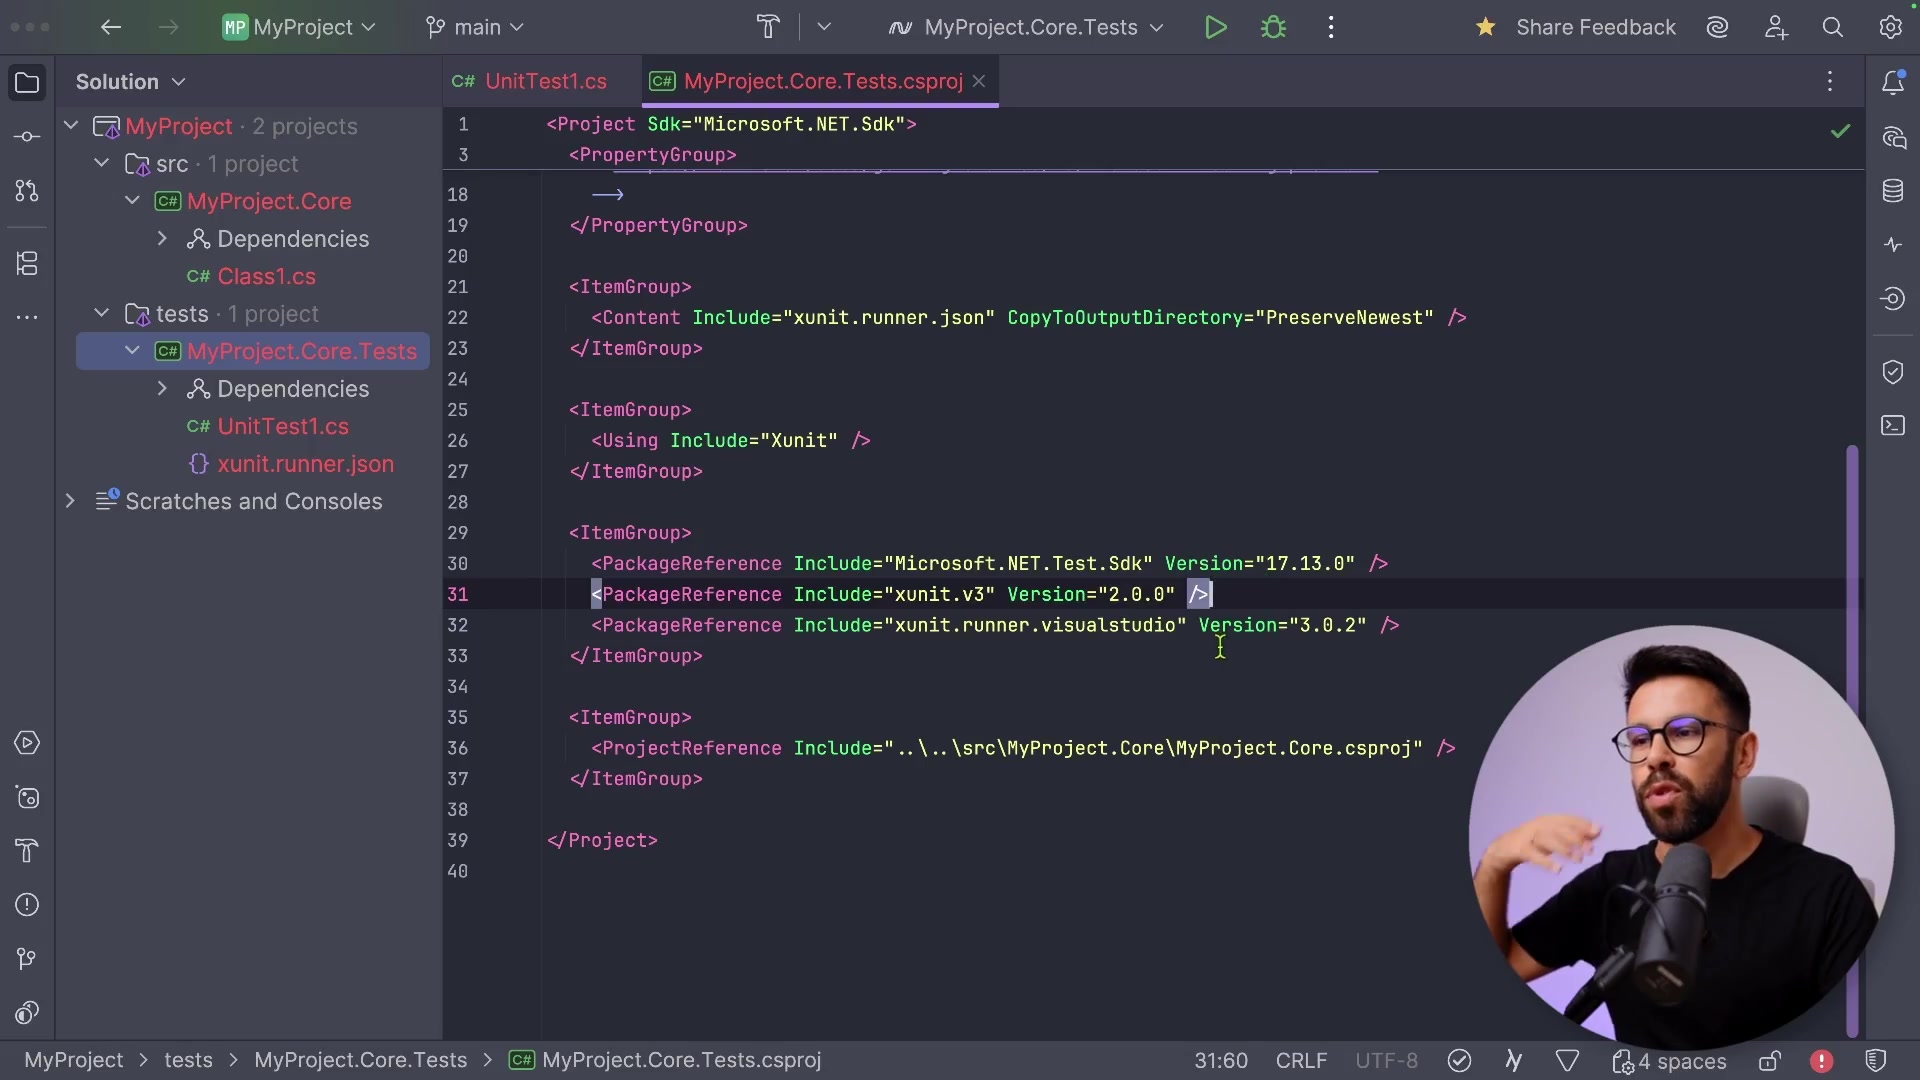
The real magic of the configuration lies in the .csproj file of your test project. Let's examine what makes an XUnit V3 project tick.
Here is the XML configuration you will find in your project file:
<Project Sdk="Microsoft.NET.Sdk">

  <PropertyGroup>
    <TargetFramework>net9.0</TargetFramework>
    <ImplicitUsings>enable</ImplicitUsings>
    <Nullable>enable</Nullable>
    <IsPackable>false</IsPackable>
    <IsTestProject>true</IsTestProject>
  </PropertyGroup>

  <ItemGroup>
    <PackageReference Include="Microsoft.NET.Test.Sdk" Version="17.13.0" />
    <PackageReference Include="xunit.v3" Version="1.1.0" />
    <PackageReference Include="xunit.runner.visualstudio" Version="3.0.2" />
  </ItemGroup>

  <ItemGroup>
    <ProjectReference Include="..\..\src\MyProject.Core\MyProject.Core.csproj" />
  </ItemGroup>

</Project>
There are several key elements here:
- Project References: You can see the reference to
MyProject.Corethat we added earlier. - Microsoft.NET.Test.Sdk: This is a required package for any .NET test project. It provides the integration with the MSBuild system.
- xunit.v3: This is the core testing framework. Note that with V3, the versioning reset, so you might see version numbers like
1.0or2.0even though it is the third major iteration of the library. - xunit.runner.visualstudio: This package acts as a bridge. It allows your IDE (Visual Studio, Rider, VS Code) to discover and run the tests listed in your project.
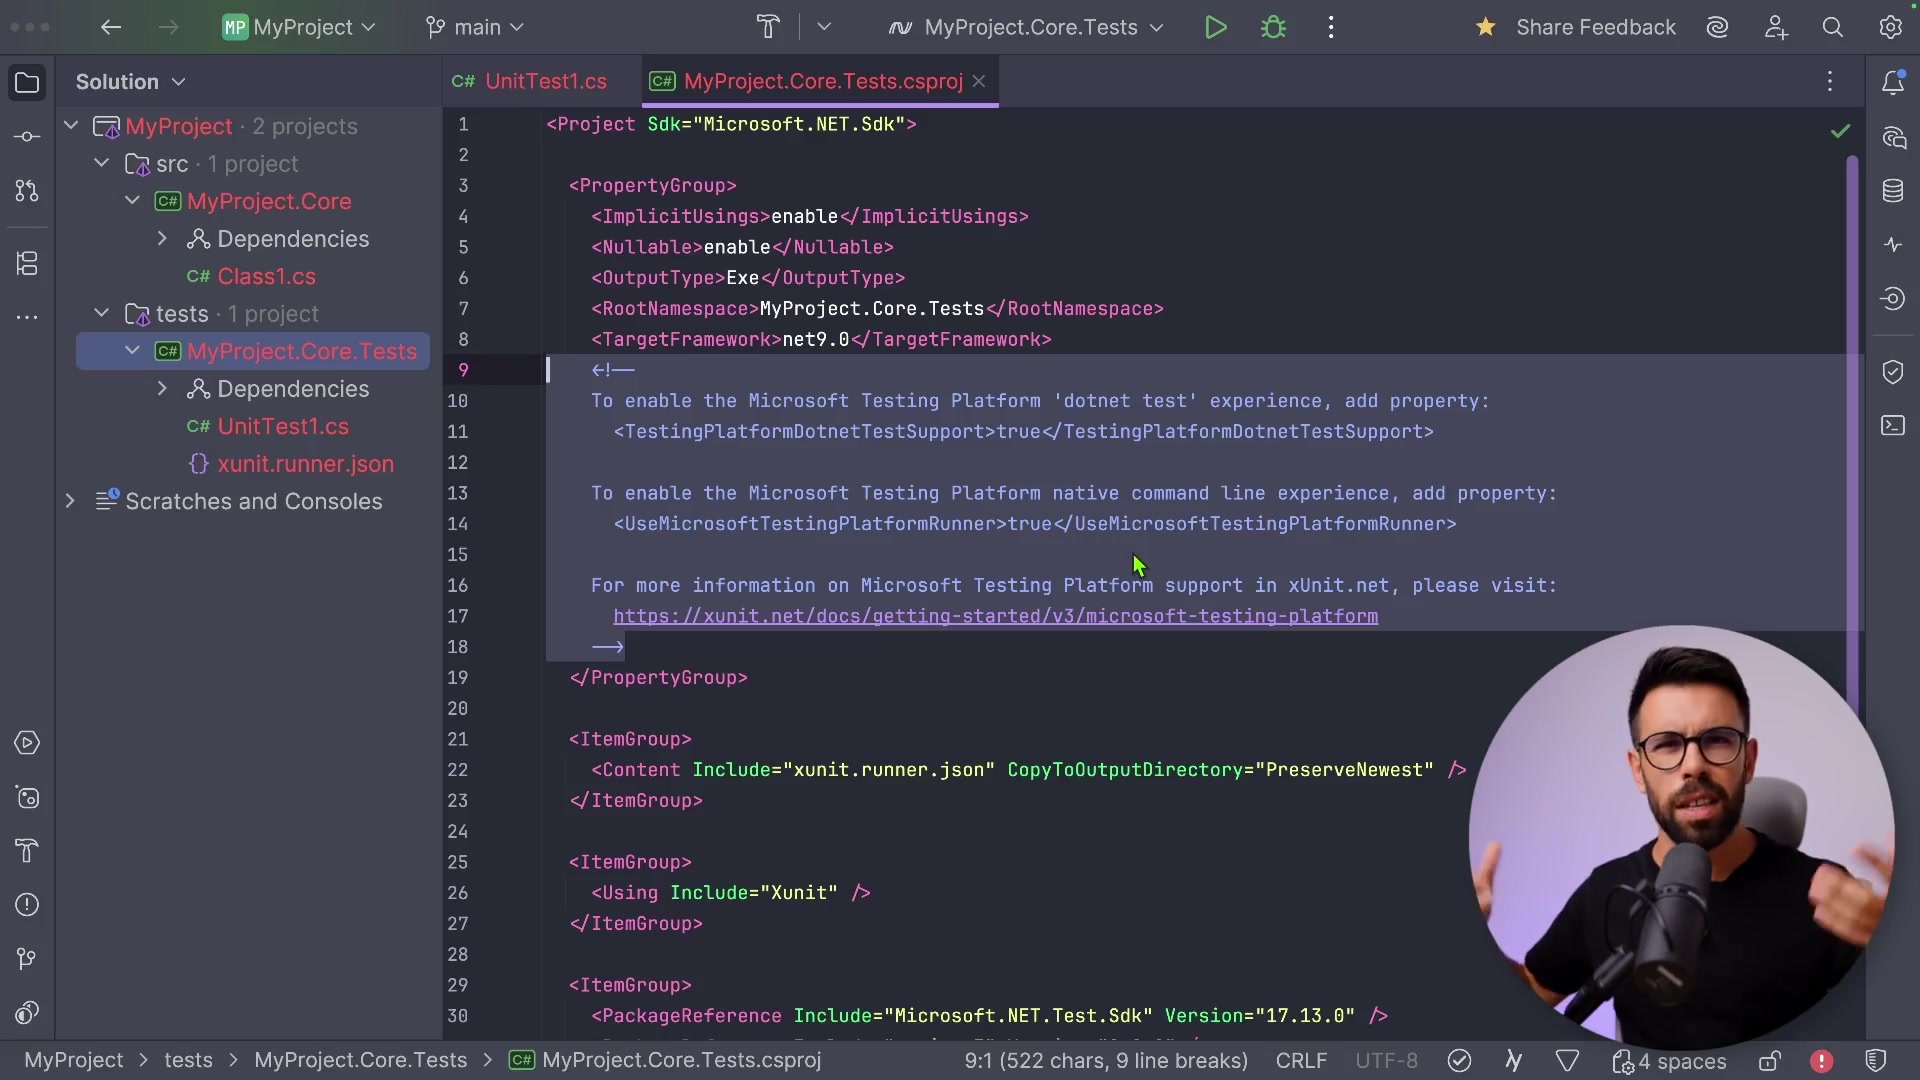
The Microsoft Testing Platform
You might notice discussions or comments in newer templates regarding the Microsoft Testing Platform. Microsoft is currently investing heavily in building a new, modern testing platform for .NET.
Historically, test runners were built on top of "VS Test," a legacy system. The new platform aims to bring more stability and reduce dependencies on reflection. While this transition is happening slowly, major frameworks like XUnit and MSTest are moving toward this new architecture.
For now, this change is mostly transparent to you as a developer, but you might need to ensure your IDE is configured to support it.
In Rider, for example, you can go to Build, Execution, Deployment > Unit Testing > VSTest and ensure that "Enable Testing Platform support" is checked. This ensures compatibility with the latest testing standards.
Running Tests in the IDE
Once your configuration is correct, running tests in the IDE is straightforward. You will typically see green "Run" icons next to your test classes or methods in the editor.
Clicking this icon will build the project and execute the specific test, showing you the results in a dedicated "Test Explorer" window. I highly recommend taking a moment to learn the keyboard shortcuts for running tests in your specific IDE. You will be doing this frequently, and shaving off those few seconds of clicking time adds up significantly over the course of a project.
Recap
We have covered a lot of ground in setting up our environment. Here is a quick summary of the key takeaways:
- Structure Matters: Organize your solution using
srcandtestsfolders to keep production and testing code distinct. - CLI is Powerful: Use
dotnet new sln,dotnet new classlib, anddotnet new xunit3to create your projects, anddotnet sln addto link them. - References are Key: Always remember to add a reference from your test project to your core project using
dotnet add reference. - XUnit V3: Be aware of the specific templates and package versions required for the latest version of XUnit.
- IDE vs. CLI: While the CLI is great for automation, your IDE provides a rich visual interface for debugging and running specific tests.
With this foundation in place, you are now ready to start writing meaningful unit tests that ensure the quality and reliability of your .NET applications.
Thanks for reading, and happy coding!