

Getting Started: AI for .NET Developers
Get started with integrating AI into your .NET applications effectively using the latest LLM best practices.

Large Language Models (LLMs) are becoming more powerful as new models are released. By default, these models are isolated and can’t access real-time data, external databases, or APIs. Model Context Protocol (MCP) provides an open, standardized way for AI models to discover and use external tools, resources, and prompts. By providing access to external tools, AI agents can integrate with various third-party services and automate processes. .NET 10 now fully supports building and using these servers.
In this guide, you’ll learn how MCP works. You’ll build two types of MCP servers in .NET. First, you’ll create a local Stdio server that exposes tools, resources, and prompts. Then, you’ll build a Streamable HTTP server that exposes a tool over HTTP. You’ll discover how you can test both servers using GitHub Copilot. Finally, you’ll integrate both into a custom .NET chat client.
The Model Context Protocol (MCP) provides a standardized interface for AI models to discover and interact with external tools and data sources. MCP Servers provide the external tooling and resources that chat clients connect to via an MCP Client.
MCP Servers expose three resource types to MCP clients:
These resource types are invoked using JSON-RPC 2.0, using one of the following transport protocols:
.NET supports all three resource types and both transport types. Using the official C# SDK for MCP, you’ll implement both server types in the following sections.
Ensure you have the .NET 10 SDK installed and a code editor or IDE that supports it.
To test your MCP servers, you can use any AI chat client with MCP support. This article demonstrates the servers using GitHub Copilot in Visual Studio Code, which supports all MCP features on its free tier. Alternatively, the MCP Inspector lets you test your MCP Server by manually invoking tools.
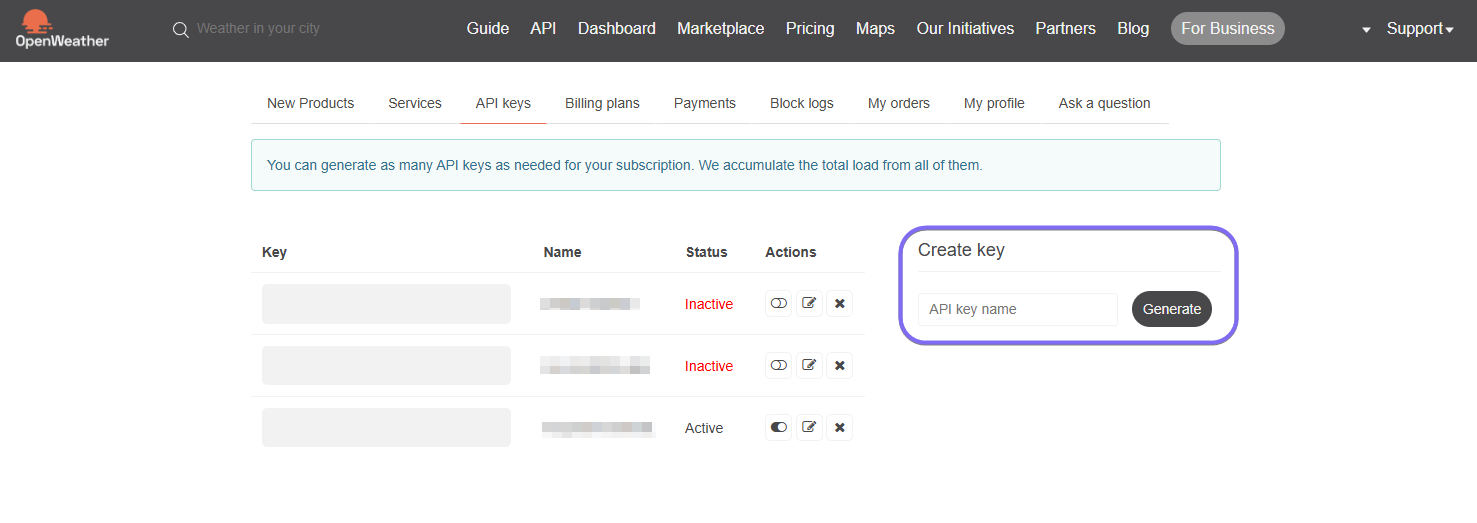
One of the MCP Servers you’ll implement uses OpenWeatherMap’s free Geocoding API to retrieve coordinates. To access it, create an API Key by registering for a free account and generating an API Key. Save the API Key for later.
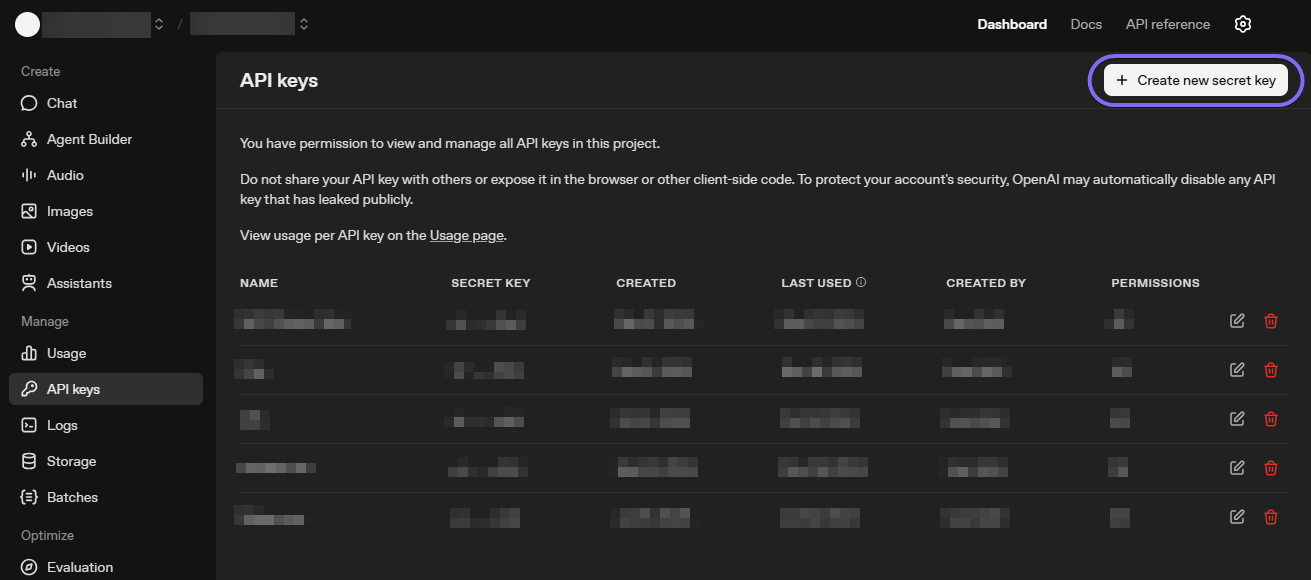
You’ll also need an OpenAI API Key to implement the MCP Client. This is a paid API, but this article uses one of the more affordable, tool-enabled models. Create a new account, create an API Key,, and store it for later.
With those prerequisites in place, you can begin building your first MCP Server.
For your first MCP Server, you’ll implement a Stdio server that runs locally and communicates with the LLM via standard input and output. This approach is well-suited for tools that interact with local data.
Your Stdio server will expose a tool that calculates the distance between two coordinates using the Haversine algorithm. It will also expose a “Home Coordinates” resource to store the user’s home address, along with a tool and a prompt template to update it.
To start, open a new terminal window and run the following commands:
dotnet new console -o StdioCoordinateServer
cd ./StdioCoordinateServer
This command creates a blank Console application, which is all you need to host a Stdio server.
Now, install the MCP C# SDK using the following command:
dotnet add package ModelContextProtocol --version 0.4.0-preview.3
At the time of writing, the SDK packages are still in beta, so you need to install the specific prerelease version.
You must also install the Microsoft.Extensions.Hosting NuGet package to register the MCP-related services in your project:
dotnet add package Microsoft.Extensions.Hosting --version 10.0.0
With packages installed, you can start developing the server.
To expose the Stdio MCP Server, register the MCP server in your service container and instruct it to use the Stdio transport in your Program.cs file:
using Microsoft.Extensions.DependencyInjection;
using Microsoft.Extensions.Hosting;

var builder = Host.CreateApplicationBuilder(args);

builder.Services
    .AddMcpServer()
    .WithStdioServerTransport();

await builder.Build().RunAsync();
In the snippet above, .AddMcpServer() registers the services, and .WithStdioServerTransport() instructs the MCP Server to use the Stdio transport.
Open your project in your preferred code editor or IDE. Create a new folder in your project called Tools and then paste the following code into a file called HaversineDistanceTool.cs:
using System.ComponentModel;
using ModelContextProtocol.Server;

namespace StdioCoordinateServer;

[McpServerToolType]
public class HaversineDistanceTool
{
    private const double EarthRadiusInMeters = 6378100;

    private double ToRadians(double degrees) => degrees * Math.PI / 180;

    [McpServerTool(Name = "calculate_haversine_distance", Title = "Calculate Haversine Distance")]
    [Description("Calculates the Haversine distance in meters between two geographic coordinates.")]
    public double CalculateHaversineDistance(double latitude1, double longitude1, double latitude2, double longitude2)
    {
        var firstLatitudeInRadians = ToRadians(latitude1);
        var firstLongitudeInRadians = ToRadians(longitude1);
        var secondLatitudeInRadians = ToRadians(latitude2);
        var secondLongitudeInRadians = ToRadians(longitude2);

        var dLat = secondLatitudeInRadians - firstLatitudeInRadians;
        var dLon = secondLongitudeInRadians - firstLongitudeInRadians;

        var a = Math.Sin(dLat / 2) * Math.Sin(dLat / 2) +
                Math.Cos(firstLatitudeInRadians) * Math.Cos(secondLatitudeInRadians) *
                Math.Sin(dLon / 2) * Math.Sin(dLon / 2);
        var c = 2 * Math.Atan2(Math.Sqrt(a), Math.Sqrt(1 - a));

        return EarthRadiusInMeters * c;
    }
}
The snippet above defines an MCP tool. The [McpServerToolType] attribute is added to the class so that it can be scanned for MCP tools.
The CalculateHaversineDistance method implements the logic for calculating the distance between coordinates. To expose the tool over MCP, add the [McpServerTool] attribute to the method, which defines the function name and a user-friendly title. The [Description] attributes also help the LLM understand the tool’s functionality.
Lastly, configure the MCP SDK to scan your project for MCP Tools by adding the following line to your MCP Server registration in Program.cs:
builder.Services
    .AddMcpServer()
    .WithStdioServerTransport()
    // Scan for MCP Tools
    .WithToolsFromAssembly();
Your tool will now be exposed when you run your MCP Server. Before testing it, let’s implement the remaining functionality for this server.
Now, you’ll create an MCP resource to store the user’s home coordinates. The user can add this resource as a reference in their chat. The LLM will then be able to retrieve the resource value (i.e., the coordinates) whenever it decides it’s relevant.
First, create a record to store a set of precise coordinates by creating a Coordinates.cs file with the following code:
namespace StdioCoordinateServer;

public record Coordinates(decimal Latitude, decimal Longitude);
Now, create a new Resources folder and, inside it, make a HomeAddressResource.cs class file. Paste the following code inside:
using System.ComponentModel;
using System.Text.Json;
using ModelContextProtocol.Server;

namespace StdioCoordinateServer;

[McpServerResourceType]
public class HomeAddressResource
{
    private readonly JsonSerializerOptions _jsonSerializerOptions = new(JsonSerializerDefaults.Web);

    public static Coordinates? HomeAddressCoordinates { get; set; }

    [McpServerResource(Name = "home_address_coordinates", Title = "Home Address Coordinates", MimeType = "application/json")]
    [Description("The user's home address coordinates, if it's set.")]
    public string GetHomeAddress()
    {
        // Return error if not set
        if (HomeAddressCoordinates is null)
        {
            return JsonSerializer.Serialize(new
                {
                    Error = "The user's home address has not been set"
                },
                _jsonSerializerOptions);
        }

        // Return coordinates as JSON if set
        return JsonSerializer.Serialize(HomeAddressCoordinates, _jsonSerializerOptions);
    }
}
Just as you did with the tool, you must annotate the containing class with the [McpServerResourceType] attribute so the SDK knows to look for resources within it.
The user’s home address is stored in the HomeAddressCoordinates static property so it can be persisted between chat messages. In a real application, you would likely store this in persistent storage, such as a SQLite database or text file.
The GetHomeAddress method, annotated with [McpServerResource], retrieves the resource value. It checks if the address has been set and returns it. Otherwise, it returns a descriptive error message to the LLM.
To expose this resource over the MCP Server, update your Program.cs file with the following line:
builder.Services
    .AddMcpServer()
    .WithStdioServerTransport()
    .WithToolsFromAssembly()
    // Scan for MCP Resources
    .WithResourcesFromAssembly();
Right now, there’s no way to set a home address. To support this, add a new UpdateHomeAddressTool.cs file to your Tools directory with the following code:
using System.ComponentModel;
using ModelContextProtocol.Server;

namespace StdioCoordinateServer;

[McpServerToolType]
public class UpdateHomeAddressTool
{
    [McpServerTool(Name = "update_home_address_coordinates", Title = "Update Home Address Coordinates")]
    [Description("Updates the user's home address coordinates.")]
    public void UpdateHomeAddress(decimal latitude, decimal longitude)
    {
        HomeAddressResource.HomeAddressCoordinates = new Coordinates(latitude, longitude);
    }
}
This tool’s implementation is straightforward: it retrieves the coordinates from the LLM and updates the resource’s property. Since tool scanning is already configured, the MCP SDK will automatically expose this tool.
Instead of having the user manually write a message to update their home address, you can create a prompt template with placeholders that the user can populate and send.
Create a new Prompts folder in your project. Inside the directory, create a file called UpdateHomeAddressPrompt.cs and paste the following code:
using System.ComponentModel;
using ModelContextProtocol.Server;

namespace StdioCoordinateServer;

[McpServerPromptType]
public class UpdateHomeAddressPrompt
{
    [McpServerPrompt(Name = "update_home_address_prompt", Title = "Update Home Address Prompt")]
    [Description("A prompt to update the user's home address.")]
    public string GetUpdateHomeAddressPrompt(decimal latitude, decimal longitude) =>
        $"Please update the user's home address to latitude {latitude} and longitude {longitude}.";
}
As with the MCP tool and resource, annotate the class with the [McpServerPromptType] attribute so the MCP SDK scans it for prompts. The prompt is implemented as a method, with parameters as placeholder values that the user can specify. The method uses those placeholders to construct the final prompt.
As with MCP tools and resources, update the Program.cs file so it scans and exposes prompts in the project:
builder.Services
    .AddMcpServer()
    .WithStdioServerTransport()
    .WithToolsFromAssembly()
    .WithResourcesFromAssembly()
    // Scans for MCP Prompts
    .WithPromptsFromAssembly();
You’re now ready to test your Stdio server in GitHub Copilot.
To test the MCP Server, create a new directory and open Visual Studio Code in that directory:
mkdir mcp-server-test
code ./mcp-server-test
To configure MCP servers in Visual Studio Code, you need to create an MCP configuration file in .vscode/mcp.json. Once created, paste the following JSON template:
{
    "servers": {
        "stdio-coordinate-server": {
            "type": "stdio",
            "command": "dotnet",
            "args": [
                "run",
                "--project",
                "<PATH_TO_PROJECT>/StdioCoordinateServer/StdioCoordinateServer.csproj"
            ]
        }
    },
    "inputs": []
}
Replace <PATH_TO_PROJECT> with the absolute path to your Stdio MCP Server project file.
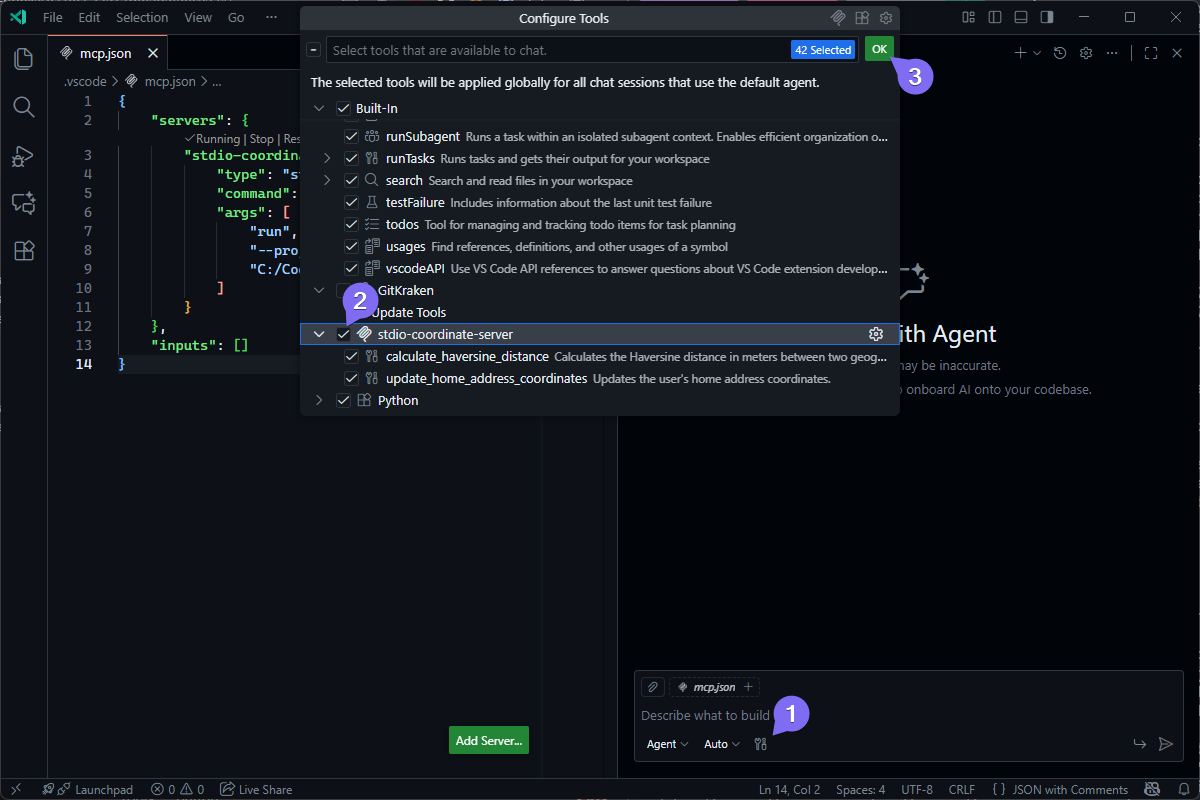
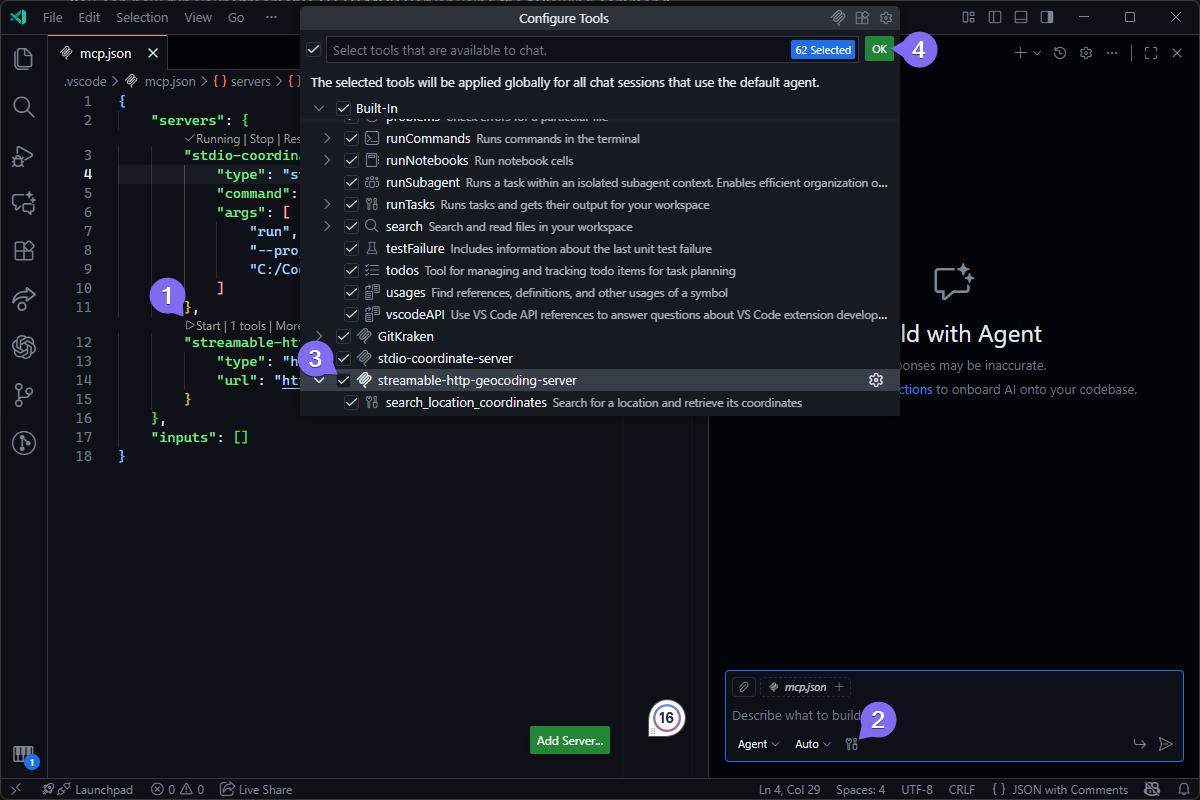
Now, open GitHub Copilot in Visual Studio Code and click on the “Configure Tools…” icon. In the menu that appears, scroll down to the stdio-coordinate-server and select all the tools. Click OK to save.
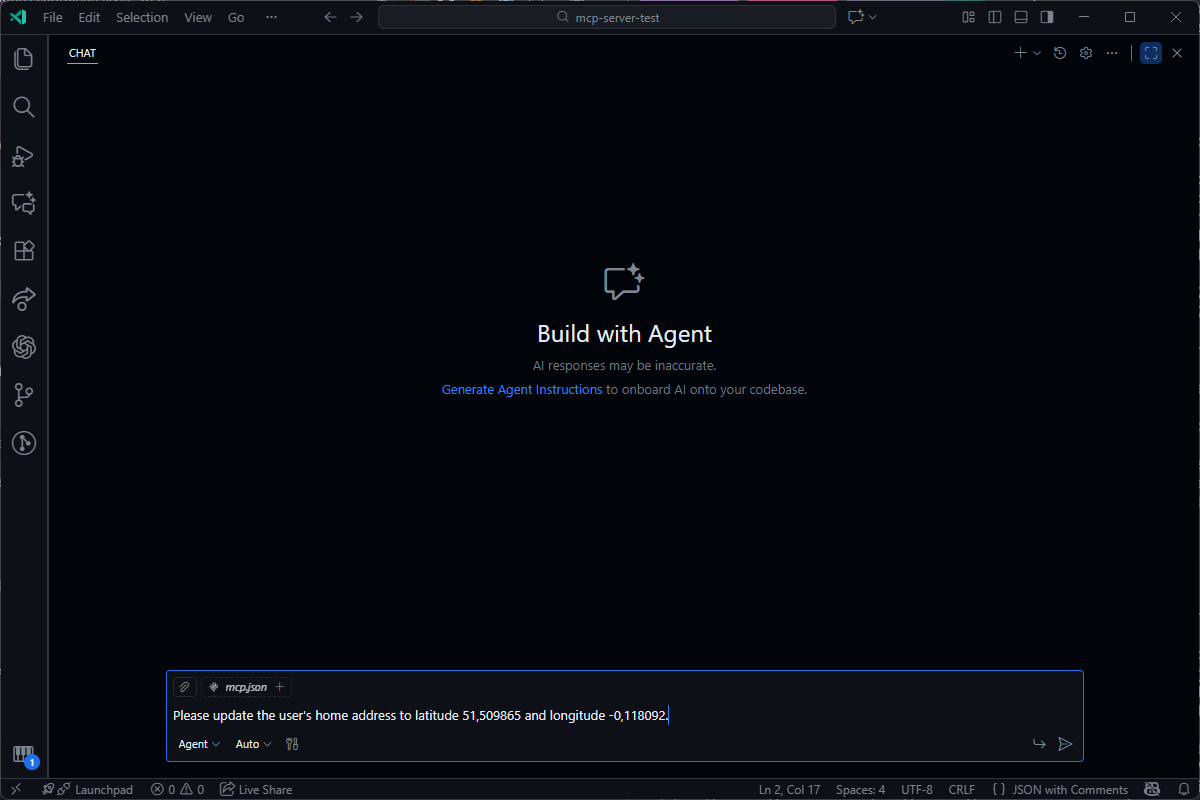
You can start by updating your home address coordinates using the MCP Prompt you defined. You access prompts in Visual Studio Code’s GitHub Copilot with a forward slash:
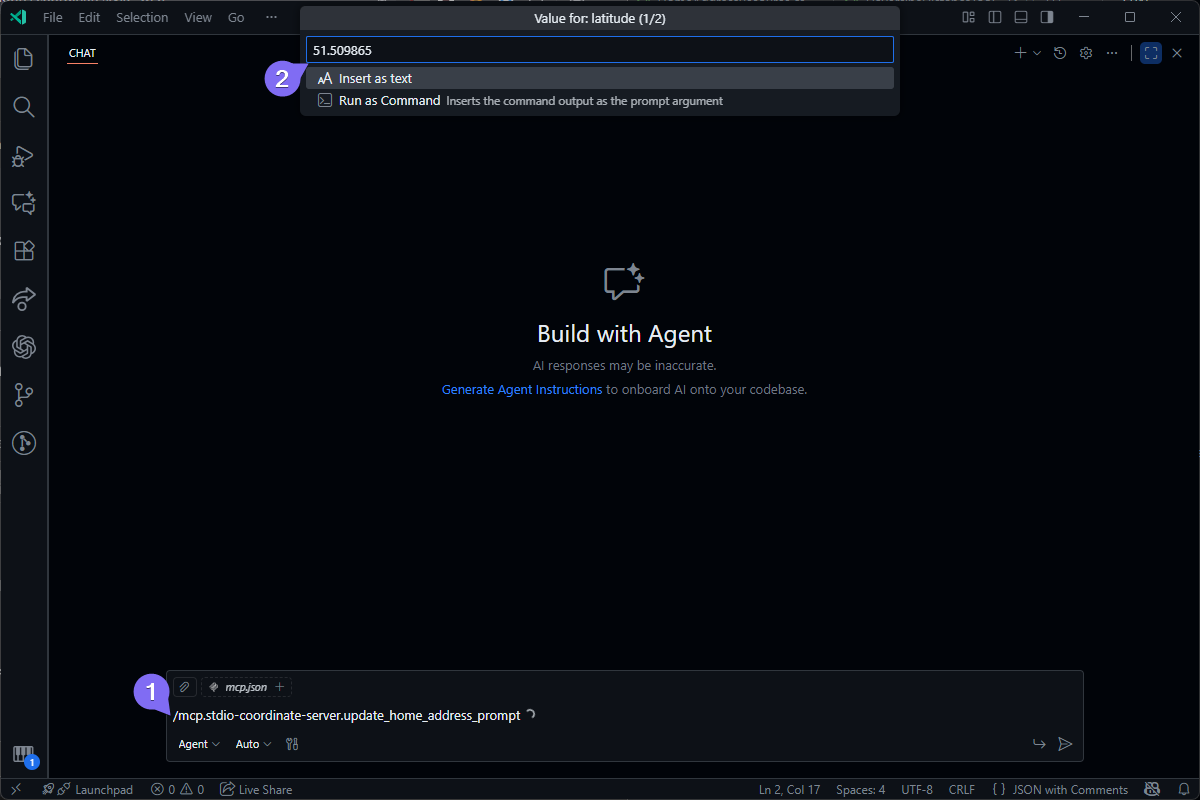
Pass in the latitude and longitude parameters when prompted. You’ll then see a prepopulated message appear, ready to send immediately:
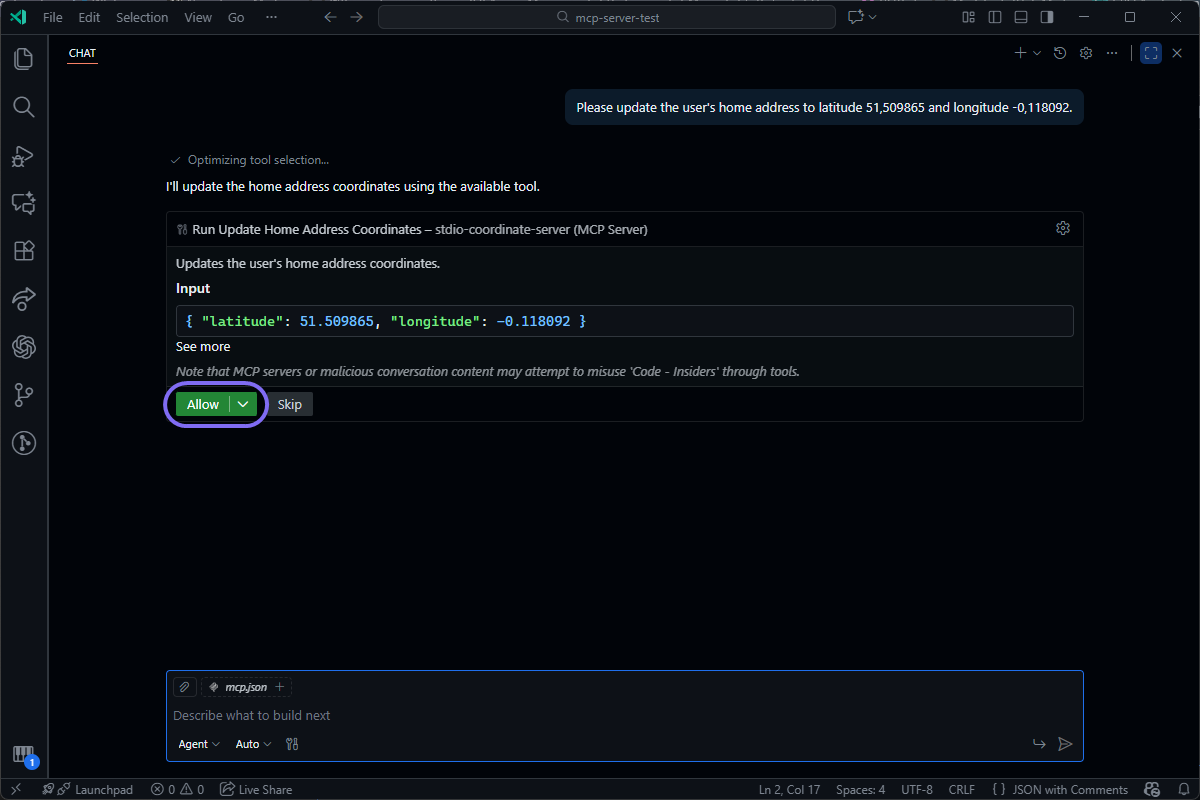
When prompted to run the MCP Tool, click Allow:
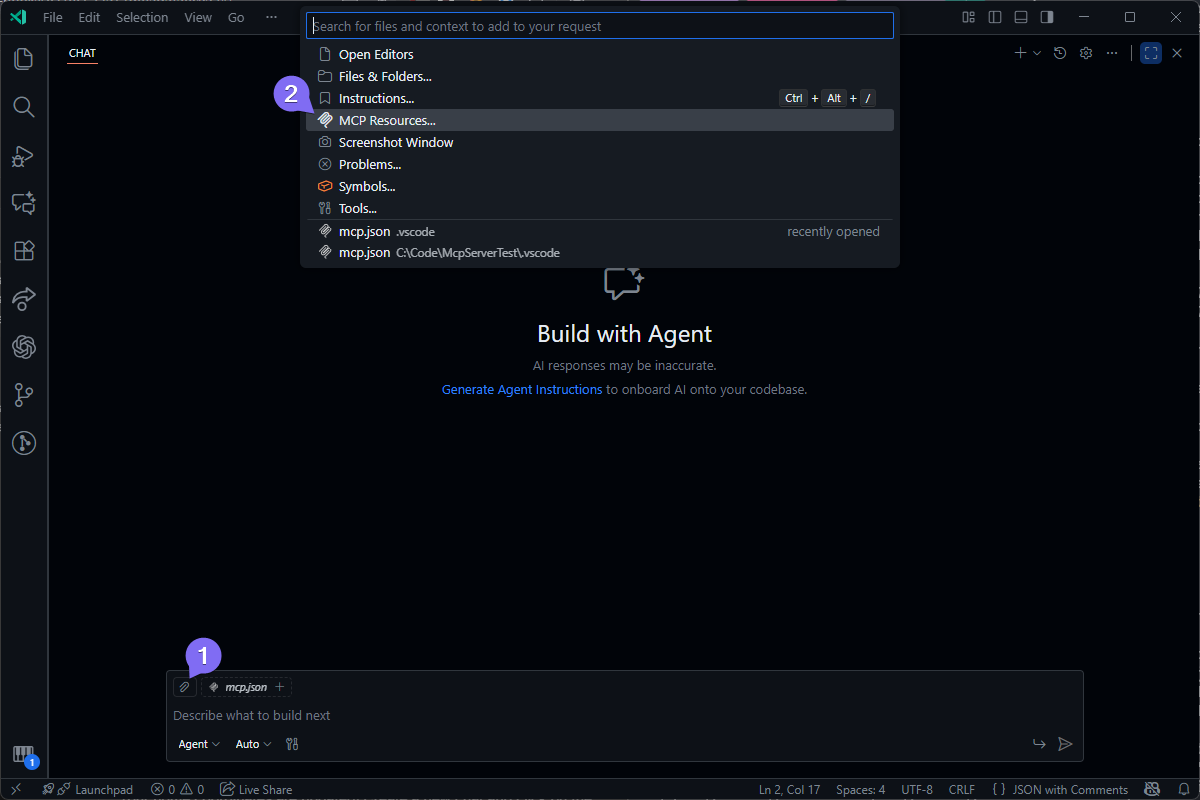
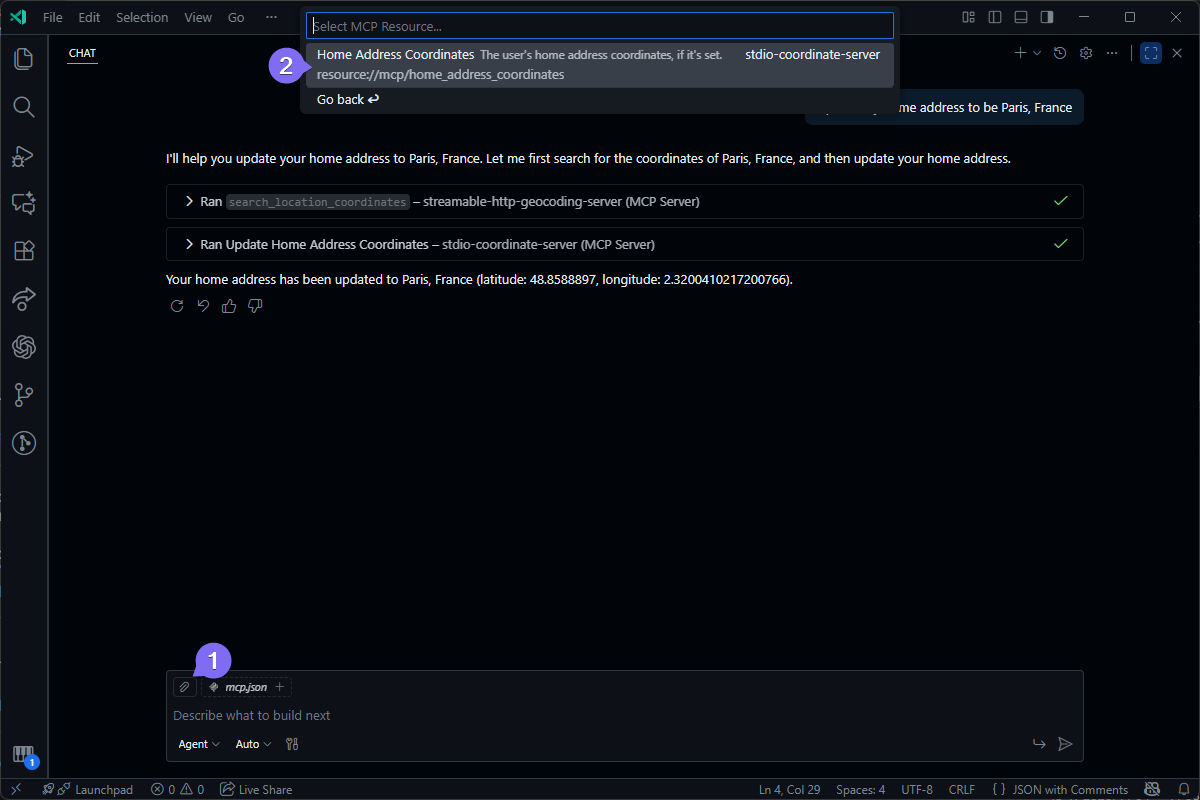
Your home coordinates are updated! Create a new chat and click on the Add Context button. Select MCP Resources in the menu that appears:
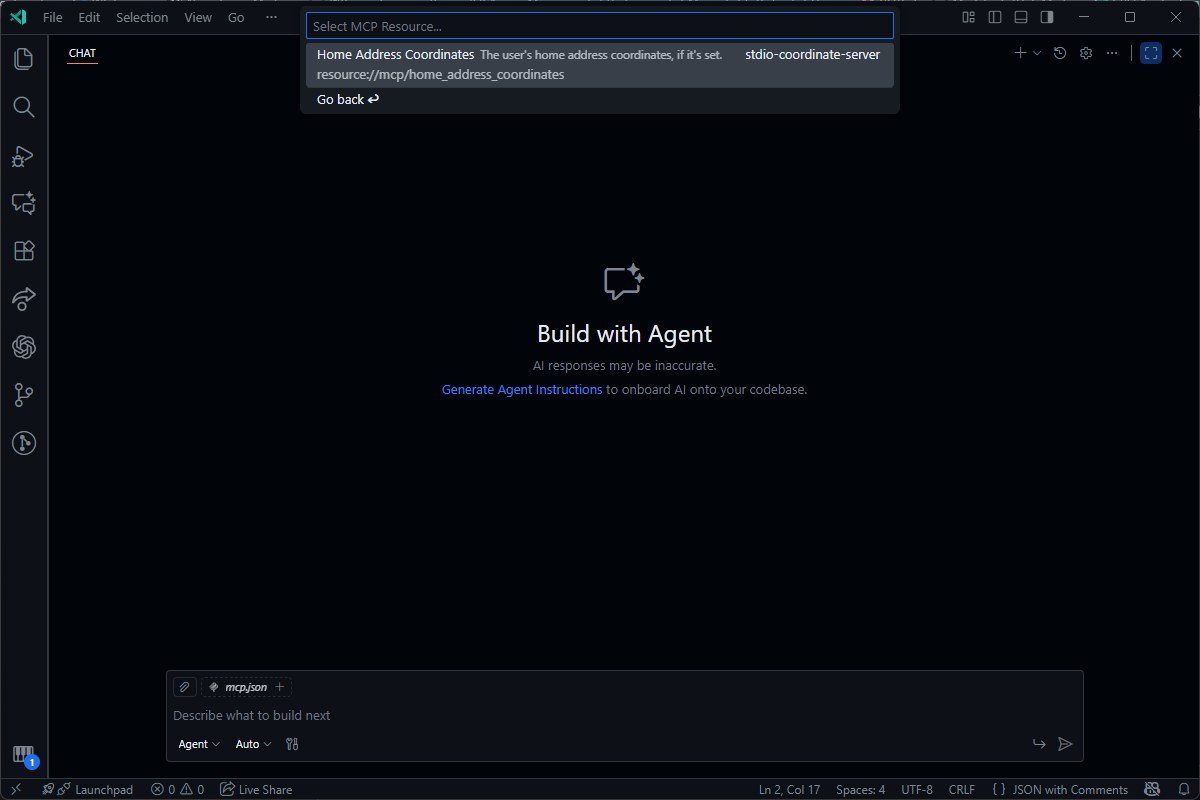
You’ll see your server’s MCP Resource appear. Select it to add it to your chat context:
Send a message asking what your home coordinates are:
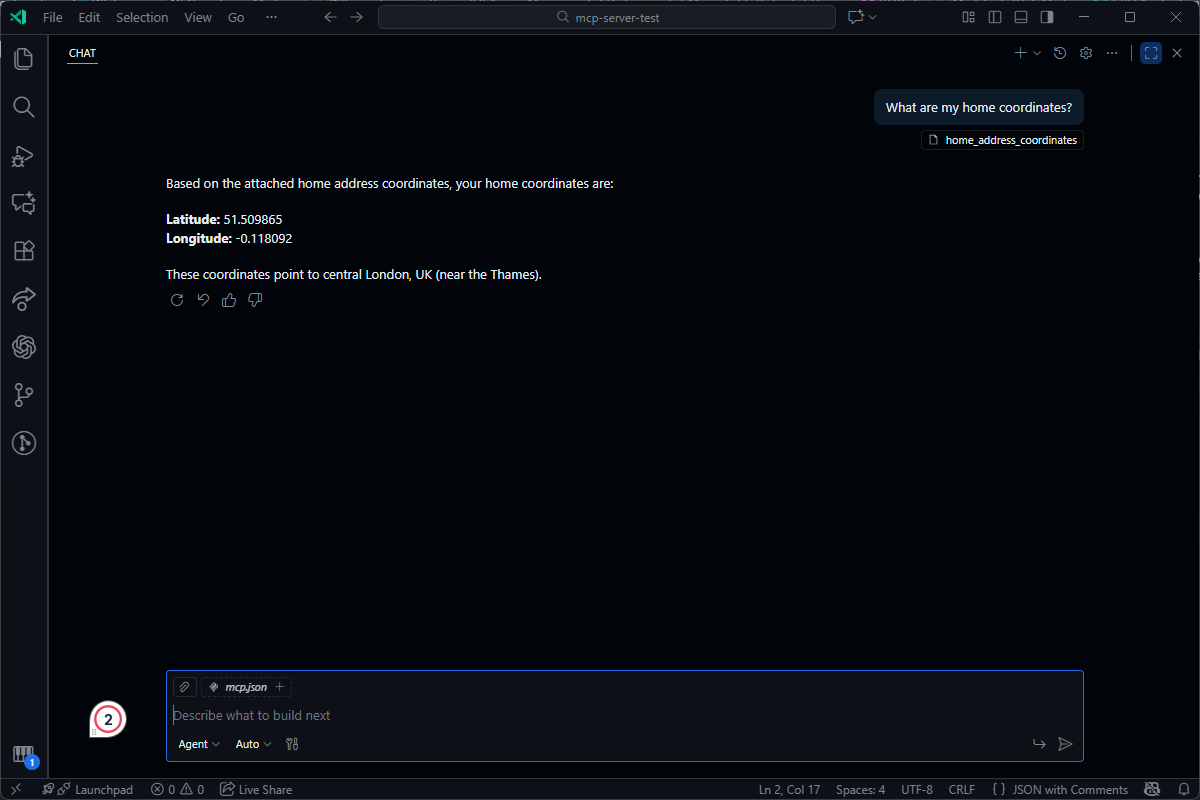
Notice how the original coordinates you provided are returned in the response because the MCP Resource is included in the LLM’s context.
The previous MCP Server used the Stdio transport to communicate with the LLM. However, this transport is not ideal if you want to offer a hosted MCP Server as a service. The Streamable HTTP transport is designed for these scenarios.
In this demonstration, you’ll build a Streamable HTTP MCP Server that accepts a location name and uses the OpenWeatherMap Geocoding API to retrieve its coordinates. These coordinates can then be used with the Stdio server you just built.
Open a new terminal window and create a new C# Web API project using the following command:
dotnet new webapi -o StreamableHttpGeocodingServer
cd ./StreamableHttpGeocodingServer
This time you’ll install the ModelContextProtocol.AspNetCore package, which lets you expose MCP endpoints in ASP.NET:
dotnet add package ModelContextProtocol.AspNetCore --version 0.4.0-preview.3
Open the project in your preferred editor. Before diving into the code, open the appsettings.json file and add the following properties:
{
  // Existing config...
  "OpenWeatherMap": {
    "BaseUrl": "https://api.openweathermap.org",
    "ApiKey": "<YOUR_API_KEY>"
  }
}
Replace <YOUR_API_KEY> with the API Key you created earlier. Since this is a sensitive value, you would typically store it in a secrets store, such as AWS Secrets Manager or Azure Key Vault, instead of in appsettings.json. For convenience, this demo stores the API Key here.
With your configuration out of the way, you can proceed with setting up the necessary services by replacing the entire Program.cs file with the snippet below:
var builder = WebApplication.CreateBuilder(args);

// Register HttpClient to call OpenWeatherMap API
builder.Services.AddHttpClient("OpenWeatherMap", client =>
{
    var baseUrl = builder.Configuration["OpenWeatherMap:BaseUrl"] ??
                  throw new InvalidOperationException("OpenWeatherMap Base URL not configured");
    var apiKey = builder.Configuration["OpenWeatherMap:ApiKey"] ??
                 throw new InvalidOperationException("OpenWeatherMap API key not configured.");

    client.BaseAddress = new Uri(baseUrl);
    client.DefaultRequestHeaders.Add("x-api-key", apiKey);
});

// Register MCP Server with HTTP Transport
builder.Services
    .AddMcpServer()
    .WithHttpTransport()
    .WithToolsFromAssembly();

var app = builder.Build();

app.MapMcp();

await app.RunAsync();
The first service registration adds the IHttpClientFactory so the DI container can manage HttpClient instances, which you’ll use when calling the OpenWeatherMap API.
Next, the MCP Server SDK is registered. This time, you call .WithHttpTransport() instead of .WithStdioServerTransport(). The .WithToolsFromAssembly() method is also called so your geocoding tool gets exposed by the server.
The app.MapMcp() method registers the relevant HTTP endpoints with the MCP Server.
Create a new Tools folder to store your MCP Tools. Inside, create a C# class file called LocationCoordinateLookupTool.cs and paste the following code inside:
using System.ComponentModel;
using System.Text.Json;
using ModelContextProtocol.Server;

namespace StreamableHttpGeocodingServer;

// Record to deserialize the OpenWeatherMap Geocoding results
public record GeocodingSearchResult(string Name, decimal Lat, decimal Lon, string Country);

[McpServerToolType]
public class LocationCoordinateLookupTool(IHttpClientFactory httpClientFactory)
{
    private readonly HttpClient _httpClient = httpClientFactory.CreateClient("OpenWeatherMap");
    private readonly JsonSerializerOptions _jsonSerializerOptions = new(JsonSerializerDefaults.Web);

    [McpServerTool, Description("Search for a location and retrieve its coordinates")]
    public async Task<string> SearchLocationCoordinates(
        [Description("Query containing the city name and ISO 3166 country code")] string query)
    {
        var response = await _httpClient.GetFromJsonAsync<GeocodingSearchResult[]>($"/geo/1.0/direct?q={query}&limit=1");

        var result = response?.FirstOrDefault();
        if (result is null)
        {
            return JsonSerializer.Serialize(new
            {
                Error = "Could not find coordinates for the specified location."
            }, _jsonSerializerOptions);
        }

        return JsonSerializer.Serialize(new
        {
            result.Name,
            result.Country,
            Latitude = result.Lat,
            Longitude = result.Lon
        }, _jsonSerializerOptions);
    }
}
The IHttpClientFactory configured in the Program.cs file is injected into the tool class and the OpenWeatherMap client is retrievd. The class has the [McpSeverToolType] attribute, and the method also has the appropriate [McpServerTool] attribute, very much like the Stdio server.
You might have noticed the tool parameter also has a [Description] attribute. This gives the model more information on what should be specified for the query parameter.
The tool takes the incoming query and tries to retrieve its coordinates using OpenWeatherMap. If coordinates are found, they’re returned; otherwise, a descriptive error message is returned.
You can now run your Streamable HTTP MCP Server using the following command:
dotnet run --project ./StreamableHttpGeocodingServer.csproj
Note the server’s URL, as you’ll need it when setting up the MCP Server in GitHub Copilot:

Return to your Visual Studio Code instance and open the .vscode/mcp.json file you previously configured the Stdio server in. Add the following JSON object after the existing server configuration:
{
    "servers": {
        // ...
        "streamable-http-geocoding-server": {
            "type": "http",
            "url": "<MCP_SERVER_BASE_URL>"
        }
    },
    "inputs": []
}
Start the MCP Server from the mcp.json file and add the MCP Tool to your current chat session.
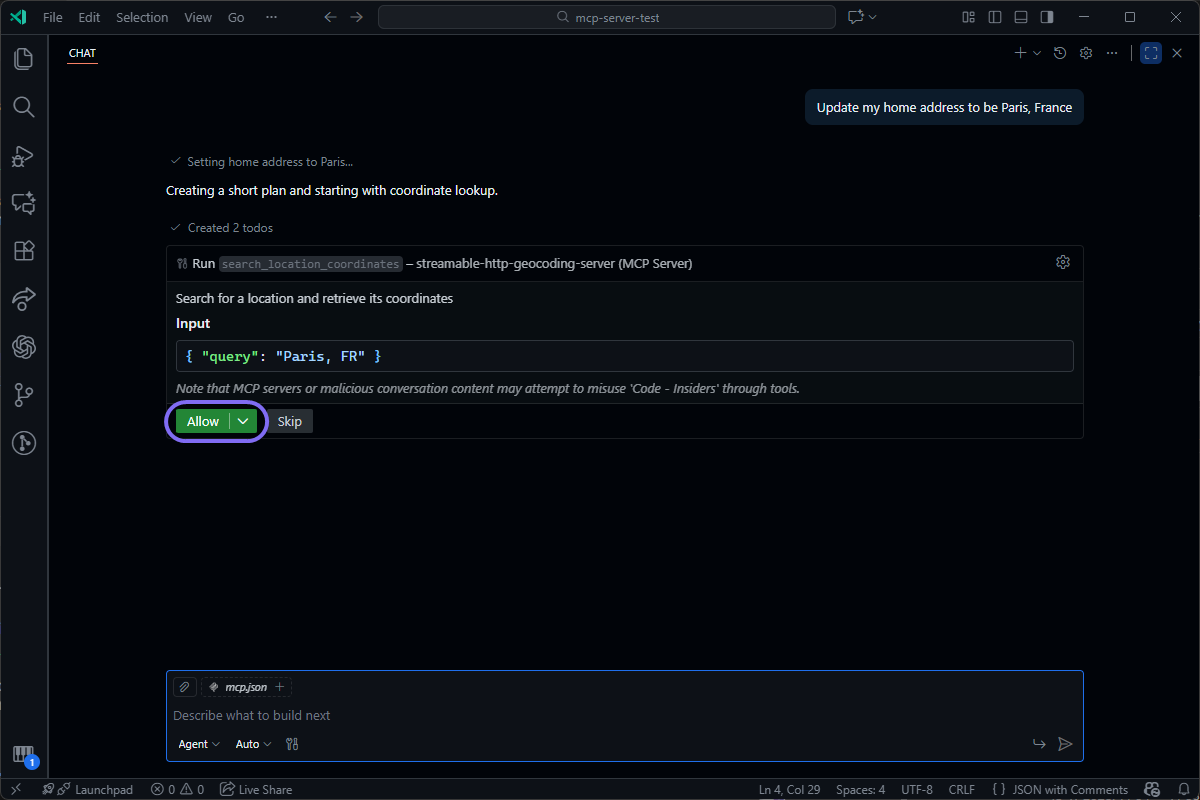
Start by setting your home coordinates again. Instead of specifying exact coordinates, you can name a city, and the model will use the new MCP Server to retrieve and store its coordinates.
When prompted to run the new MCP Tool, allow it to run.
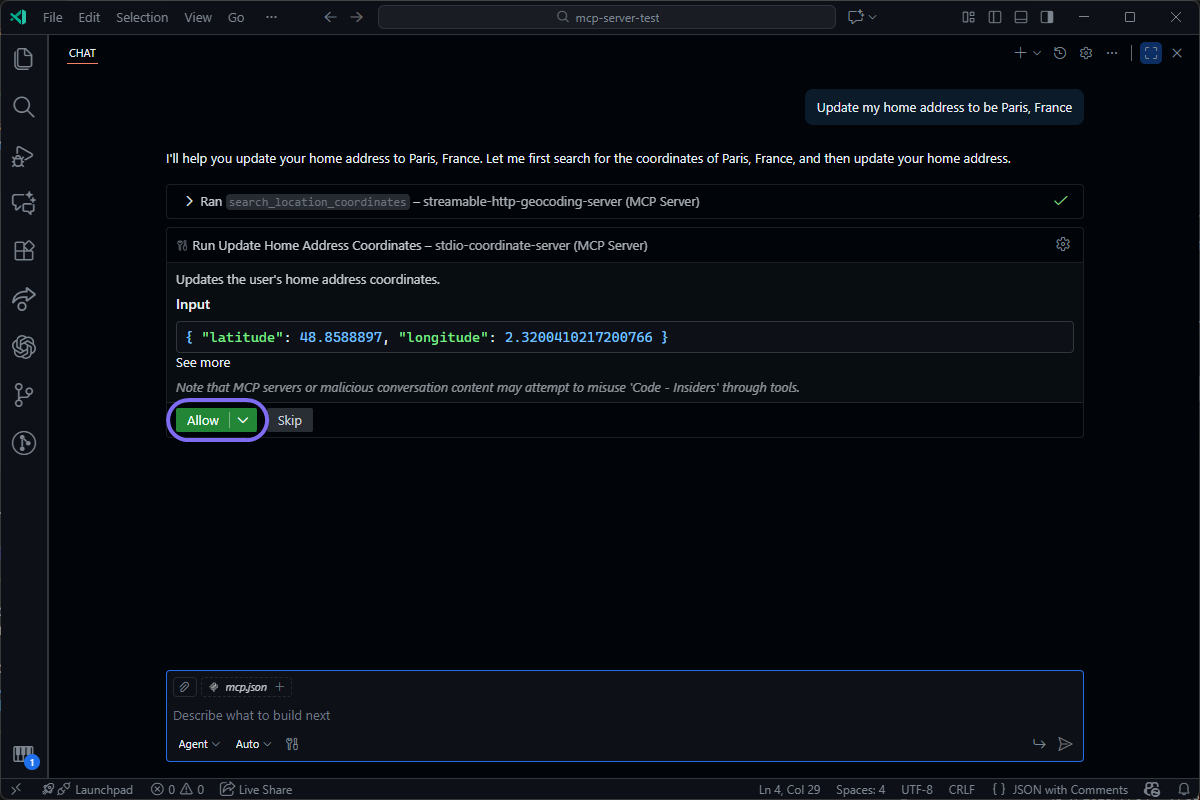
The AI model will then make another call to your Stdio MCP Server to save the coordinates retrieved from the Geocoding MCP Tool. Allow it to run:
Add the Home Address MCP Resource to your chat so that it’s in your chat context:
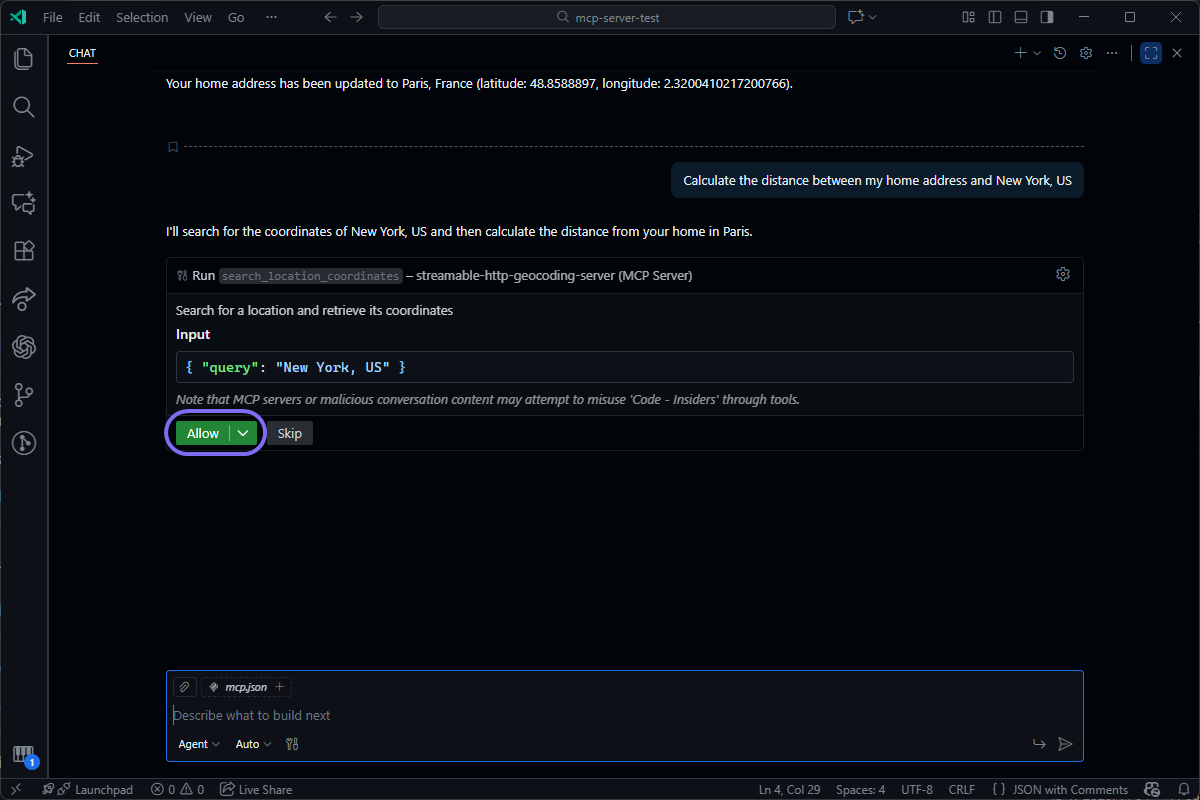
You can now ask it to calculate the distance from your home address to another location.
Grant it permission to look up the coordinates of the other location:
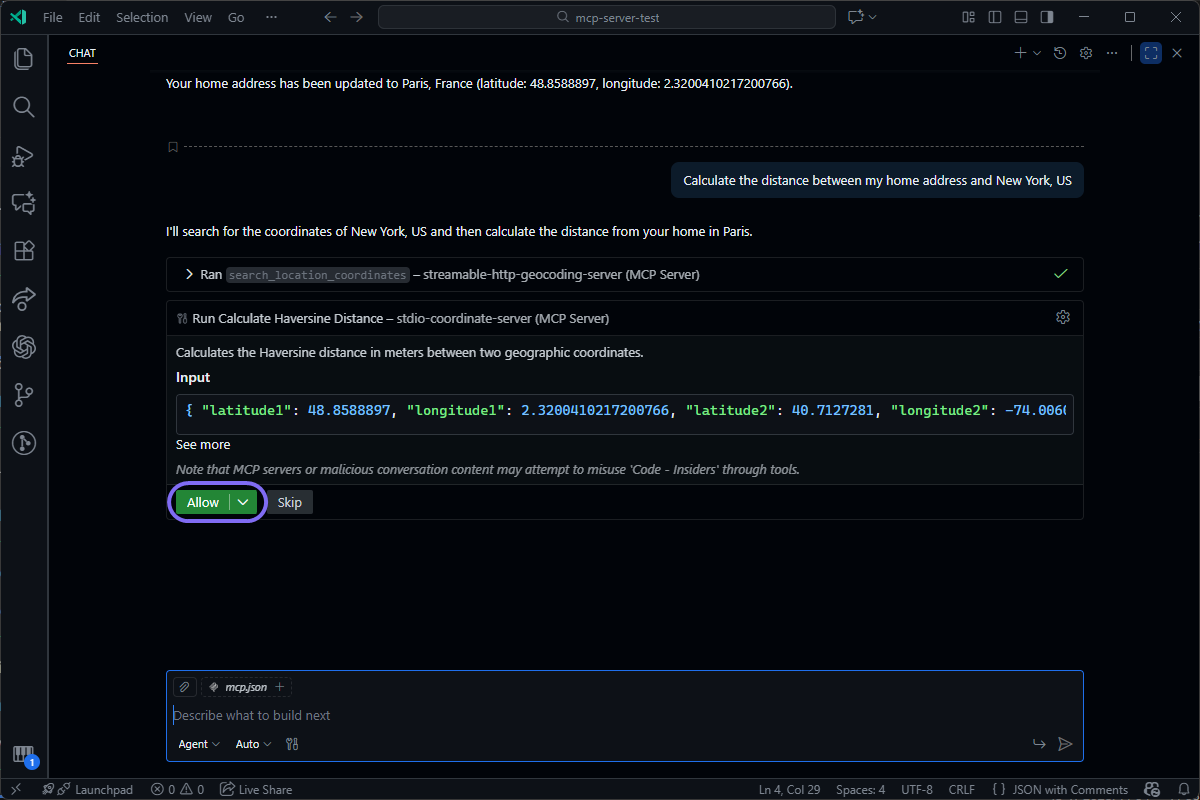
It will then request permission to call the Calculate Haversine Distance MCP Tool you developed previously, using the two sets of coordinates:
After running the tool, it will output the result:
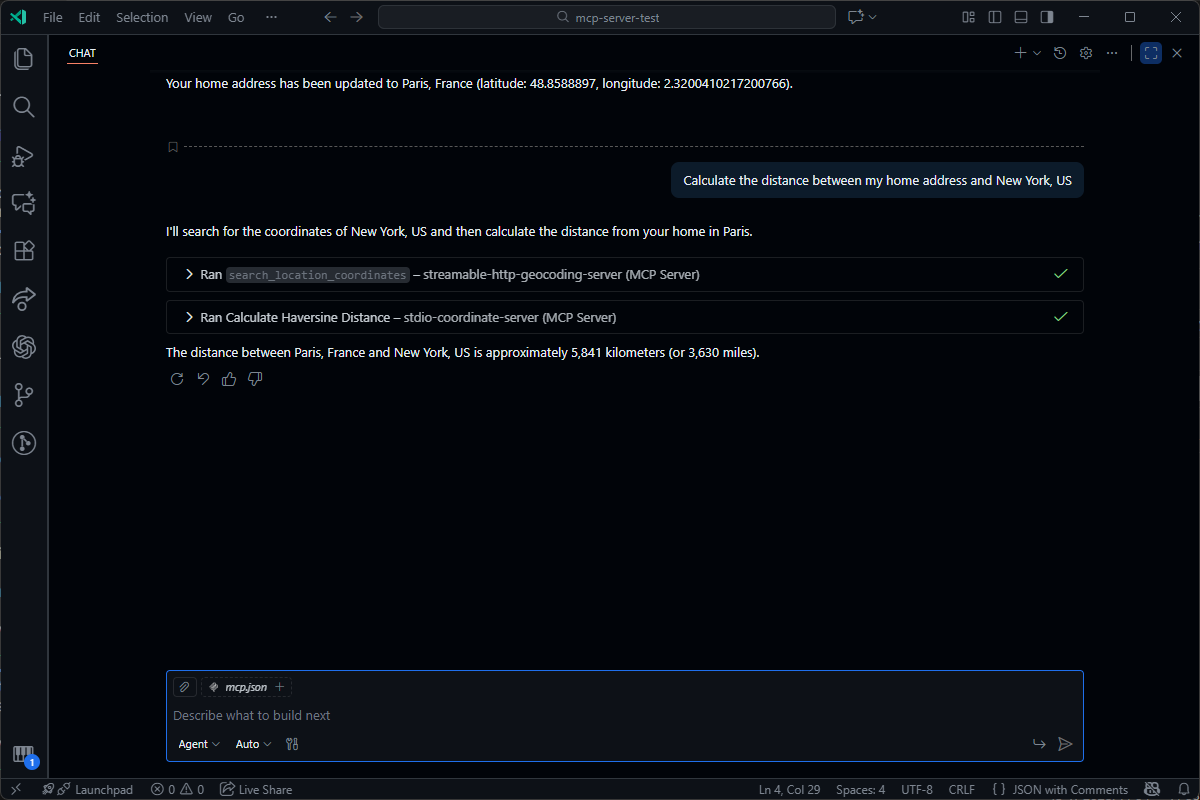
Notice how the AI model selected the correct MCP tool to run and orchestrated them in the correct order to fulfill the user’s request.
You’ve seen how to build a Stdio and Streamable HTTP MCP Server in .NET. Until now, you’ve been testing the servers in Visual Studio Code’s GitHub Copilot. This section demonstrates how to invoke these MCP Tools from a .NET application using an OpenAI model.
You’ll build a simple chatbot in a Console application. Start by running the following command to create the new project:
dotnet new console -o McpClient
cd ./McpClient
Install a few AI-related packages to scaffold the AI chat and MCP Tools:
dotnet add package Microsoft.Extensions.AI --version 10.0.0
dotnet add package Microsoft.Extensions.AI.OpenAI --version 10.0.0-preview.1.25560.10
dotnet add package ModelContextProtocol.Core --version 0.4.0-preview.3
The Microsoft.Extensions.* packages let you interface with the OpenAI API, and the ModelContextProtocol.Core package provides the necessary classes to connect the chat to your MCP Tools.
Also, install the following packages to help configure the application:
dotnet add package Microsoft.Extensions.Hosting --version 10.0.0
dotnet add package Microsoft.Extensions.Configuration --version 10.0.0
dotnet add package Microsoft.Extensions.Configuration.Json --version 10.0.0
Since you’ll be calling the OpenAI API and your existing MCP Tools, you need to store some configuration settings. Create a new appsettings.json file in your project directory and add the following properties:
{
    "OpenAI": {
        "ApiKey": "<OPENAI_API_KEY>",
        "ModelName": "gpt-5-mini-2025-08-07"
    },
    "StdioCoordinateServer": {
        "ProjectPath": "<PATH_TO_STDIO_PROJECT>/StdioCoordinateServer.csproj"
    },
    "StreamableHttpGeocodingServer": {
        "BaseUrl": "<GEOCODING_SERVER_BASE_URL>"
    }
}
The configuration specifies the GPT-5 Mini model, an affordable LLM from OpenAI that supports function calls. Replace <OPENAI_API_KEY> with the API Key you created at the beginning of this guide.
For the MCP Server configuration, replace <PATH_TO_STDIO_PROJECT> with the actual path to the Stdio MCP Server project. Also, replace <GEOCODING_SERVER_BASE_URL> with the base URL for your Streamable HTTP MCP Server.
To ensure the appsettings.json file is copied to your build folder, add the following to your McpClient.csproj file:
<Project Sdk="Microsoft.NET.Sdk">
    <PropertyGroup>
        <!-- App Properties -->
    </PropertyGroup>
    <ItemGroup>
      <!-- Dependencies -->
    </ItemGroup>
    <!-- Add the section below -->
    <ItemGroup>
      <None Update="appsettings.json">
        <CopyToOutputDirectory>Always</CopyToOutputDirectory>
      </None>
    </ItemGroup>
</Project>
Open the Program.cs file and replace the code with the following:
using Microsoft.Extensions.AI;
using Microsoft.Extensions.Configuration;
using ModelContextProtocol.Client;
using OpenAI;
using ChatMessage = Microsoft.Extensions.AI.ChatMessage;

var config = new ConfigurationBuilder()
    .SetBasePath(Directory.GetCurrentDirectory())
    .AddJsonFile("appsettings.json", optional: false, reloadOnChange: true)
    .Build();
The code above loads the appsettings.json file, allowing you to access the OpenAI and MCP Server configurations.
Now, create a new chat client by appending the file with the following:
var apiKey = config["OpenAI:ApiKey"];
var modelName = config["OpenAI:ModelName"];
var chatClient = new ChatClientBuilder(new OpenAIClient(apiKey).GetChatClient(modelName).AsIChatClient())
    .UseFunctionInvocation()
    .Build();
Notice how you add .UseFunctionInvocation() to instruct the chat to use functions exposed by your MCP Servers.
Next, configure the MCP Servers by adding the following code to the bottom of the Program.cs file:
var localMcpServer = await McpClient.CreateAsync(new StdioClientTransport(new()
{
    Command = "dotnet",
    Arguments = ["run", "--project", config["StdioCoordinateServer:ProjectPath"]],
    Name = "stdio-coordinate-server"
}));

var remoteMcpServer = await McpClient.CreateAsync(new HttpClientTransport(new()
{
    Endpoint = new Uri(config["StreamableHttpGeocodingServer:BaseUrl"]),
    Name = "streamable-http-geocoding-server"
}));


List<AITool> availableTools = [..await localMcpServer.ListToolsAsync(), ..await remoteMcpServer.ListToolsAsync()];
The snippet above creates an MCP Client for each of your MCP Servers. After adding the servers, you compile a list of all the available tools on both servers.
You can now add an infinite loop at the end of the Program.cs file that prompts the user for a message and responds until you terminate the process:
var messages = new List<ChatMessage>();
while (true)
{
    Console.Write("User: ");
    messages.Add(new ChatMessage(ChatRole.User, Console.ReadLine()));

    Console.Write("\nAI: ");
    List<ChatResponseUpdate> updates = [];
    await foreach (var update in chatClient.GetStreamingResponseAsync(messages, new() { Tools = availableTools }))
    {
        Console.Write(update);
        updates.Add(update);
    }
    Console.WriteLine("\n");

    messages.AddMessages(updates);
}
The snippet starts by creating a list of chat messages. This lets you store state across messages, since LLMs are stateless. The loop prompts the user for a message and sends it to the OpenAI API with the available tools. The response is streamed to the console and added to the message history.
To test the client, run the project using the following terminal command:
dotnet run --project ./McpClient.csproj
You’ll be prompted to enter a message. For example, ask for the distance between two cities:

If you watch the logs of your other projects, you’ll see that the chat client makes calls to the MCP Servers to retrieve the coordinates of the two cities, then calculates the distance between them.
Congratulations! You’ve created a Stdio and Streamable HTTP MCP Server with MCP Tools, Resources, and Prompts. You saw how easy it is to test each server using GitHub Copilot in Visual Studio Code. By connecting to multiple MCP Servers, the AI model can orchestrate calls appropriately. Finally, you created your own chat client in .NET and configured it to call your two MCP Servers.
While this guide covered how to get started with MCP in .NET, there is much more functionality available. MCP supports authorization, giving you control over who can access the hosted server. There are also operations a server can call on the client, such as Sampling and File System Roots, that are worth exploring further.
Given how rapidly MCP and agentic AI are being adopted, it’s definitely worth exploring further. Check out the Dometrain courses below, which dive deep into Agentic AI and MCP.
Get started with integrating AI into your .NET applications effectively using the latest LLM best practices.

Learn how to use AI Agents that can reason, use tools and take action to build products.


Deep dive into Artificial Intelligence to improve developer productivity


© 2026 Dometrain. All rights reserved.

Generate unlimited coding challenges with AI. Practice C#, Python, TypeScript, and JavaScript in your browser with instant test feedback.
Learn more about AI Code Challenge Generator
Learn how to get started with the Model Context Protocol (MCP) and integrate it into your applications.
Learn more about Getting Started: Model Context Protocol (MCP)
Learn TypeScript through hands-on coding exercises. Practice what you learn with interactive challenges designed for every level.
Learn more about Hands-On: Learn TypeScript
Learn JavaScript through hands-on coding exercises. Practice what you learn with interactive challenges designed for every level.
Learn more about Hands-On: Learn JavaScript
Master data structures and algorithms through hands-on coding exercises in C#. Free to enroll for 7 days!
Learn more about Hands-On: Data Structures & Algorithms in C#
Turn your videos into blogs and newsletters with AI. Check out our new product at blogsmith.ai.
Learn more about Blogsmith.ai
See how you stack up against other learners. Track your progress, climb the ranks, and compete with the Dometrain community.
Learn more about Leaderboard
Learn PostgreSQL through hands-on coding exercises. Practice what you learn with interactive challenges designed for every level.
Learn more about Hands-On: Learn PostgreSQL
Learn C# through hands-on coding exercises. Practice what you learn with interactive challenges designed for everyone, from beginners to experts.
Learn more about Free Hands-On: C# for Beginners
Get started with integrating AI into your .NET applications effectively using the latest LLM best practices.
Learn more about Getting Started: AI for .NET Developers
Learn how to build and deploy .NET applications on AWS using CDK, Lambda, DynamoDB, S3, and more.
Learn more about Getting Started: Building .NET Applications on AWS
This guide covers every new C# 14 feature, explains its benefits, and provides practical code examples to help you navigate how you can use them.
Learn more about What's new in C# 14
Build a Retrieval-Augmented Generation (RAG) chatbot that can answer questions using your data.
Learn more about Let's Build It: AI Chatbot with RAG in .NET Using Your Data
Enable enterprise-grade real-time communication for your web apps with SignalR.
Learn more about From Zero to Hero: SignalR in .NET
Master solution architecture and turn business needs into scalable, maintainable systems.
Learn more about Deep Dive: Solution Architecture
A step-by-step process to migrate ASP.NET Web APIs from .NET Framework to ASP.NET Core.
Learn more about Migrating: ASP.NET Web APIs to ASP.NET Core
Let's make the hardest thing in programming easy for .NET software engineers.
Learn more about Getting Started: Caching in .NET
Learn how to test any codebase in .NET with the latest version of xUnit, the industry-standard testing library.
Learn more about From Zero to Hero: Testing with xUnit in C#
This walkthrough is your hands-on entry point to create a basic C# console application that talks to ChatGPT using the OpenAI API.
Learn more about Create a ChatGPT Console AI Chatbot in C#